Hello crafting friends!
It’s obvious that crafters LOVE retro.
And what a huge hit the Retro Shabby kit has been for the July Handmade Club.
So I ask you… what is it about retro that we all love so much?
Is it just the vibe of yesteryear; the fashion, the music, the lifestyle… or is it because we are ageing and grasping at life when times were simpler?
For me, it’s an era that I love for all of those reasons I guess.
This months retro theme has been so much fun to create with and over the next couple of weeks I’ll be sharing a few of the projects I’ve made with the Retro Shabby kit.

Each month I like to share a few projects that inspire you to think outside of the box, so you are making more than journals and cards.
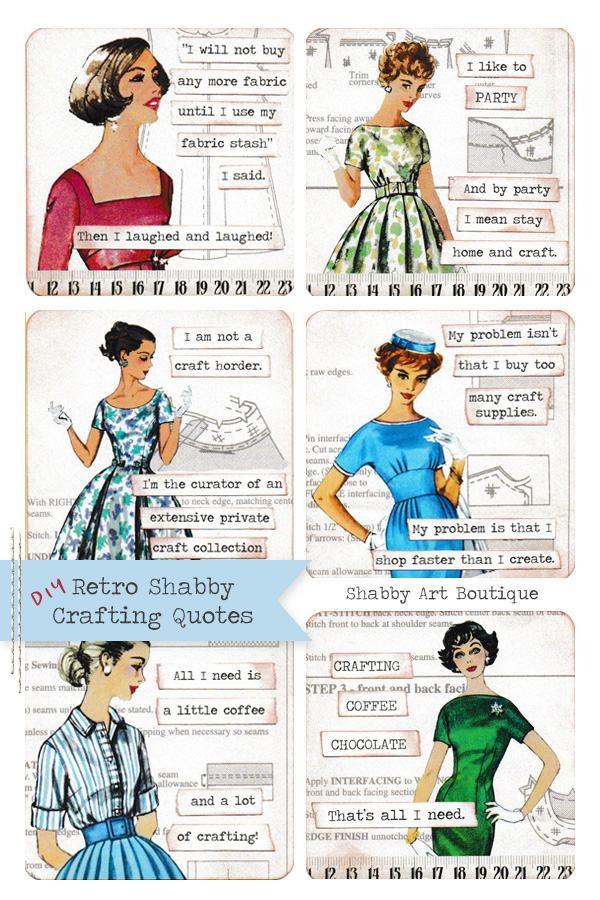
Today I made these fun retro crafting quotes in about two hours and this is a project that you can make whether you are a fussy cutter and mixed media collager or someone who prefers to design in a program like Photoshop or PS Elements.
How would you use these?
I thought they’d make great magnets or coasters… or they could be added to a journal, handmade card or tag.
How to make Retro Crafting Quotes
Materials:
-
Background – sewing pattern sheet paper from the Retro Shabby kit, printed on a piece of card (I used a sheet of 250 gms matte photo paper)
-
6 of the vintage fashion ladies
-
The tape measure graphic from the Embellishments folder
-
Typed quotes.
Instructions:
1. My 6 designs measure 9 cm x 9 cm (3.5” x 3.5”). They were cut from one sheet of A4 background paper that was printed on card. On my A4 sheet I positioned the 6 squares as 2 across and 3 down the page. If you are using letter sized paper just adjust the measurements to fit your page… you could even create rectangles instead of squares.
I cut the 6 cards out with my craft knife and a metal ruler, then used a corner punch to create curved corners. For a vintage look, I also inked the edges very lightly.
2. There are two options for decorating this project:
a) If you are a fussy cutter, insert 6 vintage ladies onto a word document and resize to fit. Print and then cut out the designs. Position them on your cards and trim off anything that extends past the bottom of the card. You could also add other graphics from the Embellishments folder.
b) If you prefer to use the graphics in Photoshop, proceed to create guidelines for your 6 squares over the top of your background sheet, decorate with the vintage ladies and any other items from the Embellishments folder. Save, print and cut out your 6 designs.
3. Quotes – I chose the 6 quotes I wanted to include and typed them in a Word document. I printed them on a sheet of normal copy paper that had previously had a vintage look paper printed on it. This is of course optional and you may choose to print on something else.
Next, cut out the words, lightly ink the edges and adhere them to your background card using either double sided tape, glue stick or white glue.
It’s that easy!! Depending on what you choose to use the retro crafting cards for, you may need to protect the top layer with a coat of matte gel medium.

Retro Shabby Hat Box
I shared a few sneak peaks of this decorated hat box last week and there were many questions about it.
Here’s how I made it:
I used a paper mache round box with lid. Mine is quite large, but you could use this process on any size and shaped box.
To decorate the sides of the box, I used the patchwork wallpaper design from the Retro Shabby kit paper pack. Depending on the size of your box, you may need to print out several sheets on matte photo paper or copy paper. Trim the paper to the height of your box and adhere to the sides using white glue. I also used a squeegee to smooth the paper and insure that there were no air bubbles and the paper had firmly attached to the side of the box. If you don’t have a squeegee, try using an old credit card.
To decorate the lid, I used the pattern instructions paper and the tape measure paper from the Retro Shabby paper pack, one of the pattern packets and one of the vintage ladies from the Embellishments folder.
Cover the lid with your pattern instruction paper using your glue of choice. You may need more than one sheet, depending on the size of your lid.
Cut out the tape measures from the tape measure paper. Trim to the height of the side edge of your lid. Adhere them end to end around the side edge of the lid.
Re-size the pattern packet art and the vintage lady to suit the size of your box. Adhere to the top of the box using your glue of choice.
How to resize
You can do this by inserting the graphics as a picture in your word document. The graphics are quite large, so to re-size them click once on the picture so the resize points appear. To resize an image manually, you can use your mouse and manually click and drag the one of the corner resize points either towards the middle of the image to reduce the size or towards the edge of the screen to increase the size.

Collage Clipboard
The retro clipboard is such a quick and easy project, but doesn’t it look so sweet!
Instructions:
This project requires two sheets of paper; the collage paper and the patchwork paper from the Retro Shabby kit. I printed mine on matte photo paper, but you could also use normal copy paper.
Simply adhere your collage sheet to the clipboard using your glue of choice… I positioned mine to the lower left side.
Any areas of the clipboard that were left uncovered, I patched with pieces of ripped paper from the patchwork sheet. To clean up and remove any excess paper from the edges of the clipboard, I used a large nail file to sand the edges.
Finish by adding any embellishments; I used a piece of ric-rac across the clip and added a large ribbon bow.

All of these projects were made using
the Retro Shabby kit from the July Handmade Club.

I hope you found these 3 projects inspiring.
I’ll be back tomorrow with another one!
Happy crafting my friends!
Hugs
♥
Kerryanne
I’d love for you to connect with me at:


Get instant access to the free printables in our Member’s Only
library by joining my email newsletter subscriber’s list.
I send out two newsletters a month with updates on all things
‘shabbilicious’ at Shabby Art Boutique.
I invite you to join our fabulous and friendly
Facebook group – Simply Shabbilicious
where you’ll enjoy our friendly banter and inspirational creativity.


These are such fun projects!! I love them all!
I love your Retro Shabby kit! The ladies/girls are all so beautiful. I can’t wait to use them.
I also really love your crafty quotes, and can see some scraplifting in the very near future. 🙂
Kerryanne these are just darling. I love the quotes! I grew up in the 50’s so this retro style is all me! I wore those kinds of dresses (though not hats!)….wore those full skirts with all the slips underneath… and made them myself! Just fun remembering those days… the good times and the “good ole’ days”. Thank you for this beautiful kit. Marilyn
I love love love your ideas for these retro pages Kerryanne❣️❣️❣️ How fun are these??? Your quotes are just the best??? Thank you for sharing these great ideas…take care??? Smiles, Deborah ???
I am just in love with this kit! Thank you for posting the instructions on how to make the hat box and the clipboard! I am planning to use your kit as inspiration to redo my laundry room/sewing room very soon! So I am brainstorming ideas with things and decor I can make for it with your kit. LOVE IT!!!!
Always love your ideas. I laughed out loud and thought of several friends as I read through these!
the ideas are fun and elegant too
lots to ponder in weeks to come when sheltering in place
aloha Lilla
I made this tonight and it’s darling!
I really love the July kit. Thanks so much, Kerryanne!