Hello creative friends,
I’m back again with another bonus project for the April Handmade Club kit, Boutique Parisienne.
Yesterday I shared this cute Mini Sewing & Mending Journal.
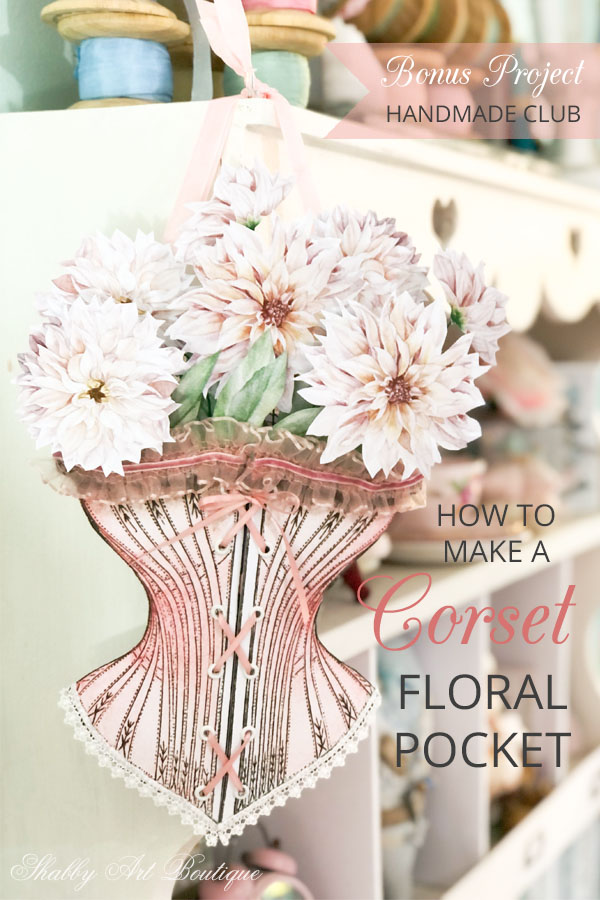
Today I have for you a pretty hanging corset floral pocket.
The corset is three dimensional and filled with paper flowers, however, you could fill it with anything you like.
This post contains affiliate links.
This is a quick and easy ‘print and make’ project that I am sharing with the members of the Handmade Club.
I have just uploaded my printable PDF file to the the Handmade Club April folder, so if you have already downloaded your April kit, you’ll need to pop back in and grab this extra bonus file.
How to make a Corset Floral Pocket
Measurement: the project is 12″ (30 cm) high x 8 1/4″ (21 cm) wide.
Materials:
- Download your PDF printable from the April Handmade Club Folder. It’s available in both A4 and letter (USA) size.
- Tools – sharp scissors or craft knife, hole punch and eyelet setter (I used my Crop-A-Dile).
- 12 white eyelets
- ribbons and laces
- Floristry wire
- Foam tape
- Glue – I used hot glue, clear craft glue and white glue.
Instructions:
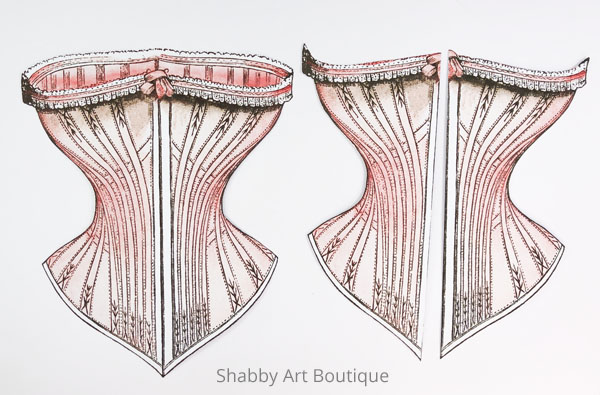
- Print the corset page twice on matte photo paper and cut out the corsets.
For the second corset, trim off the back image at the top of the corset and then cut the corset in half vertically down the centre line of the corset.
2. Use a ruler to evenly mark 6 eyelet spaces down the centre front of the corset.
Tip: I laid the two halves on top of each other and punched the eyelet holes for both layers at the same time.
Add the eyelets.
3. Thread a piece of ribbon through the eyelet holes on the front of the corset. Don’t tie it off yet, but keep the excess ribbon secured at the top of the corset while we complete it.
Apply a thin bead of white glue along the side perimeter of the corset that forms the backing… leaving the top open see diagram below.
Position your two front corset pieces, so that they match up and fit neatly over the top of the backing corset.
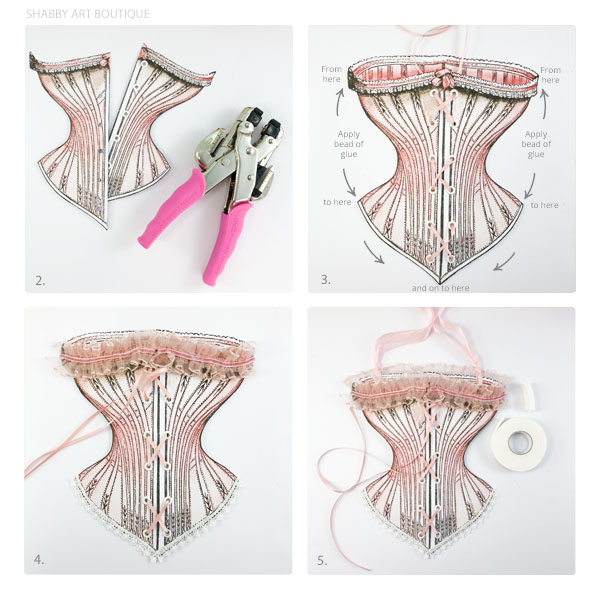
4. Once the glue has completely dried, you can add laces to the top and bottom of the corset. It will be entirely up to you how much lase you add. I used a stronger clear glue to attach the laces.
5. So as to give the front of the corset some dimension, I added some foam tape between the two layer at the top of the corset. It is important to remember that there is going to be leaves and flowers inserted here, so we don’t want to block access. I cut 2 pieces of tape about 1/2″ (1.5 cm) long and placed them one on top of the other. Then I slipped it inside the top of the corset bodice, about a third of the way across the width of the corset. I repeated this step and put the tape about 2/3 the way across. It held the top out just enough. Once you are happy with your tape placement, tie your ribbon in a bow and cut off any excess ribbon.
Next, add two eyelets to the top of the backing corset and thread with seam binding or ribbon to make a hanger.
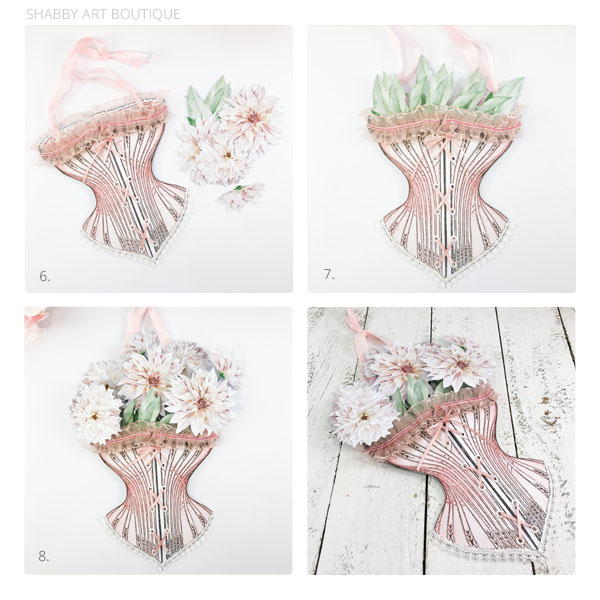
6. Adding the flowers: fussy cut all of the flowers and greenery.
7. Start by placing some of the greenery into your corset top. I used my fingers to gently shape the leaves into natural shapes.
8. I used green florist wire to make the stems for the flowers. Not only is it strong, but it is also pliable and the flowers can be bent into a more natural arrangement. I foudn a hot glue gun was the easiest way to add the wire to the back of the flowers and also to adhere them in position inside the corset.
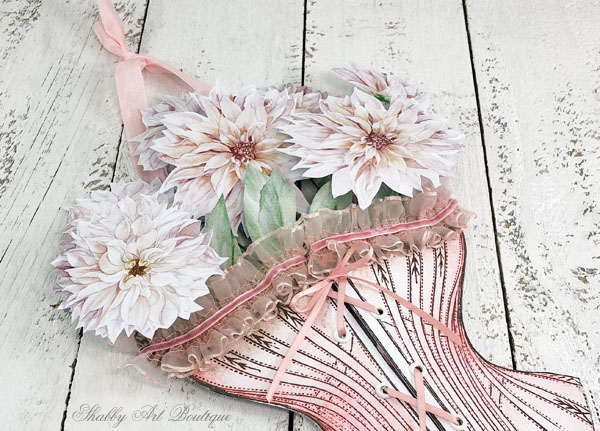
There are many possibilities for this corset loaded pocket…. a gift of flowers or… add a sentiment to use this as a handmade card or write on the back. Use it as a gift bag and pop gift vouchers or money into the top of the corset. Hang it as a decorative item in a bedroom or dressing room.
How to Download
The Corset Floral Pocket is a bonus project included in April’s Handmade Club kit, Boutique Parisienne.
If you are already a member of the club, this printable project and instructions are in the April club files as both an A4 and a letter (USA) sized PDF file. You will need to access the link in your April club email.
If you are not currently a member of the Handmade Club, but would like to know more….. you’ll find all of the information about the Handmade Club HERE.
Happy crafting my friends!
Hugs
♥
Kerryanne
Let’s be friends on….
Get instant access to the free printables in my Newsletter Printables
Library by joining my email newsletter subscriber’s list.
I send out a weekly newsletters with updates on all things
‘shabbilicious’ at Shabby Art Boutique.
I invite you to join our fabulous and friendly
Facebook group – Simply Shabbilicious
where you’ll enjoy our friendly banter and inspirational creativity.


Hi Kerryanne, Thank you for this lovely lovely Loaded Pocket. This is absolutely adorable. It is going to be so fun to put together. You made my day. Thank you for all that you do…it doesn’t go unnoticed! Stay safe my friend, be happy and love that precious puppy, she is adorable! Hugs to you!