Hello friends!
I’ve been a little quiet online this past week, as I’m working on a really big project…. [squeal] I’m super excited to share it with you in the coming weeks.
Meanwhile, I’m sharing another one of my greeting card crafts today.
I love how these cards are more than just a card…. they are kind of a gift too…. a mini piece of art and pretty enough to leave out on display or attached to a notice or mood board.

For this card I made a silk/satin flower using the easy peasy candle searing method.
If you’ve seen my DIY for fabric peonies and roses, you already know how much I adore this fabulous technique…. I ask you, who doesn’t love staring into the light of a flickering candle flame?
These fabric flowers are even easier than the peonies because the only sewing is the button attachment.

How to make a fabric flower
Materials:
Silk or satin fabrics,
Circle templates of varying sizes,
Scissors, pencil, sewing needle and cotton, and sewing pins,
Candle,
Buttons.
Instructions:
1. Make cardboard templates for 3 circles in different sizes eg. mine had a diameter of 3 cm, 5 cm and 7 cm.
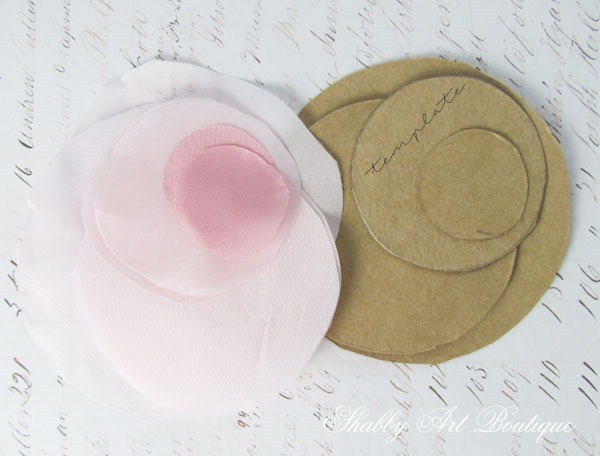
2. Trace the templates onto silk or satin fabric. I used silk lining fabric which seared easily. For this particular flower, I cut 2 circles in each size.

3. Hold the petal about 3 inches above the candle flame and carefully sear the edges. On some of the petals I melted just the very edge and there was minimal curl, but on others I allowed more curling to add bulk and shape to my flower.

4. Assemble your flower with the smallest petals on the top and the largest petals on the bottom (see above image). Secure the grouping by sewing a button in the centre of the flower, through all layers.

These flowers are so super quick, you could cut, sear and assemble quite a few in just half an hour.
I’ve shown mine adhered to a mixed media greeting card. It was as simple as cutting a piece of scrapbook card to fit the front of my premade greeting card. I added a sewn seam around the edge of that scrapbook paper. Next I added some torn pieces of paper as a background and embellished with a stamped word on a scrap of vintage book paper. A seam binding bow and the flower were adhered to the front of the card with glue.
This card was quick, easy and cheap to make… and what a lovely greeting for a friend to receive!
[PIN for later]

You may like my other handmade flower techniques…
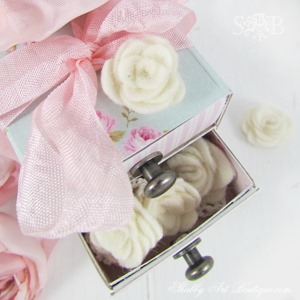
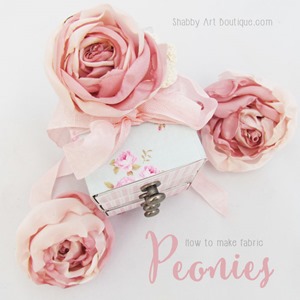
Mini Felt Flowers and Fabric Peonies & Roses
and my Scrappy Fabric Flower Tags

Happy crafting,
Hugs
♥
Kerryanne
I’d love for you to connect with me at:


Follow on Bloglovin
or if you’d like my posts delivered directly to your Inbox
Subscribe to Shabby Art Boutique by Email
If you’d like a private pass to all things ‘shabbilicious, sign up today for my fortnightly newsletter.
It contains personal stories, sneak peeks, recommendations, discounts and freebies


Oh this is so beautiful. The roses are very pretty, and I Think I must try to make some.
I am excited to see your big project
I wish You a lovely day
Lone
Hi sweetie!! So beautiful, love the colours and textures, and I really must make some of your infamous flowers!! I think I’ll make some mini ones for hair clips for my Blythe doll! Not that I’m obsessed…
have a lovely evening sweetie!!! VIK xxxxxxx
Gorgeous, Thanks so much for sharing. Hoping to try some out soon.
Those are so pretty Kerryanne! I love pink! Pinned
These are so pretty and you’ve inspired me (once again) to make some. I bought some of the lining fabric over a year ago to make some and never did! too many projects going on! I LOVE your darling card in all its shabbiness! I’m excited too to see your big project.. but I absolutely adore every single little or big project that you gift to us! Thank you so much! Marilyn in Oregon
Looking forward to seeing your big project. Have pinned the silk rose card, it is so beautiful. I have made quite a few of your crafts/tutorials, they turn out so lovely. I always love to see what you have done/ideas. Thank you.
Oh heavens you have me on pins and needles waiting to see what your big project is you’re working on.
Have too say just love these flowers in your cards, so pretty, rustic but lady like, you certainly have just the right touch Kerryanne. Hope I can do them justice. My first project tho will be making the flower tags you shared with us last time. Will take shot at those to see how I do then will tackle these flowers.
Have been doing some heavy house cleaning. Rearranging living room partly today, first time in over year or so. Needed to vacuum behind and under couch, etc. Hubs wasn’t too happy when he came in from doing some chores outside but I needed him to undo all the tv wires etc. We don’t have cable or satellite, just an antenna. He bought 50″ flat screen tv 1 1/2 yrs ago so am bit worried about doing something wrong to it. Glad to have him help me move it, then re wire all of it. We get all the network channels and other channels which have kept us happy since I got rid of Dish satellite 4 yrs. ago. Don’t miss having to pay $85 a month for so many channels we never watched, like sports. There are some I miss but not enuf to want to pay anymore.
Good luck on your secret project.
Thanks Kerryanne, you are not only super talented but so generous with your ideas – I have made quite a few of your projects – your instructions are so clear and I love that everything does not have to be perfect. Will definitely be trying these silk flower cards, now! (I have all the materials on hand)
Great projects for our Australian winters (not that they are too bad)
Also looking forward to your secret project
Hi KerryAnne, thanks for sharing all your amazing projects with everyone. I love the, all. Could you tell me what the backing paper is on this project. I am so in love I may want to wallpaper a feature wall with it. Thanks so much for your time and trouble, it is very appreciated. Kind regards, a longtime loyal subscriber, faye