It’s never too early to start crafting and preparing for Christmas.
I’ve been at it now for several weeks.
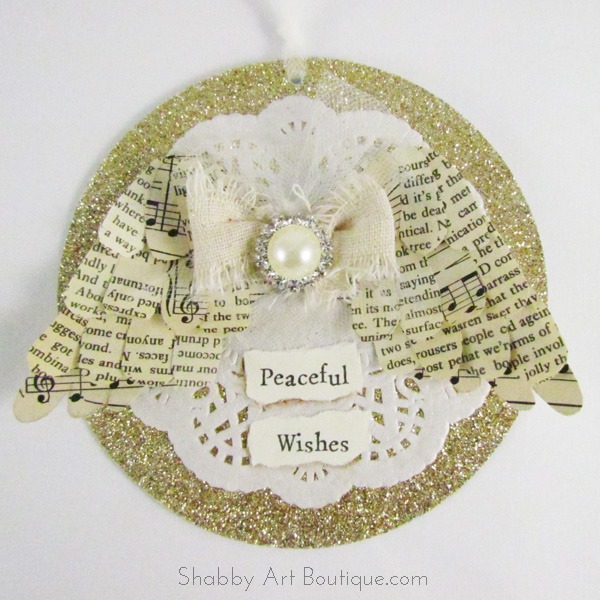
This is my first shared project for Christmas 2015… and as you would expect, it’s both vintage and shabby.

I’m joining with 30 fabulous bloggers to bring to you 31 Days of Christmas Ornaments… that’s one every day throughout October!

I decided to make something using items already in my crafting supplies.
This is a super quick and easy project too!
Materials:
Wing template, CD blank, sparkly scrapbooking card, 1 sheet of white card, 1 x small paper doily, variety of vintage book papers and music manuscript, small strip of fabric or ribbon for a bow, rhinestone & pearl button, Mod Podge & foam brush.

Instructions:
1. Gather supplies. Adhere a sheet of book paper to the plain white card using Mod Podge. When dry, trace the wing design onto the card and cut out shape.
2. Lay the CD onto the sparkly/glitter card and trace around the perimeter. Cut out shape with sharp scissors. I chose to cut two and adhere them together so both sides were sparkly.
Adhere the doily centrally on the sparkly cut-out. I punched a hole in the top of the circle using a hammer and punch, but you could use a craft knife to cut an opening.

Right click image to save to your computer.
3. Using the pattern tracing, make a template of the feather shape for the wings. Trace around the template onto various pieces of vintage paper. I actually folded a sheet over several times so I could cut many pieces at once. You will need 24 feather shapes in total. Using different prints from a variety of vintage books will add more dimension to your wings.
4. I curled the feathers around a pencil to give them a slight curved shape. Next I adhered 3 rows of four feathers on each side of the wings using Mod Podge. Only add glue to the top third of each feather, so the bottom of the feathers will curl up.
5. I used a strip of white tulle as a hanger for my ornament, but ribbon could also be used. Thread the tulle through the hole you punched in the top of the circle earlier.
6. Adhere the wings to the ornament, allowing enough room below to add some words later. Using some of the left over tulle, I made a small bow to place in the centre of the wings, before adding a bow made of ripped calico over the top… I think this added a touch of shabbiness!
To add a little bling, I cut the button backing off a pretty rhinestone button and glued the button to the centre of the calico bow using a stronger craft glue.
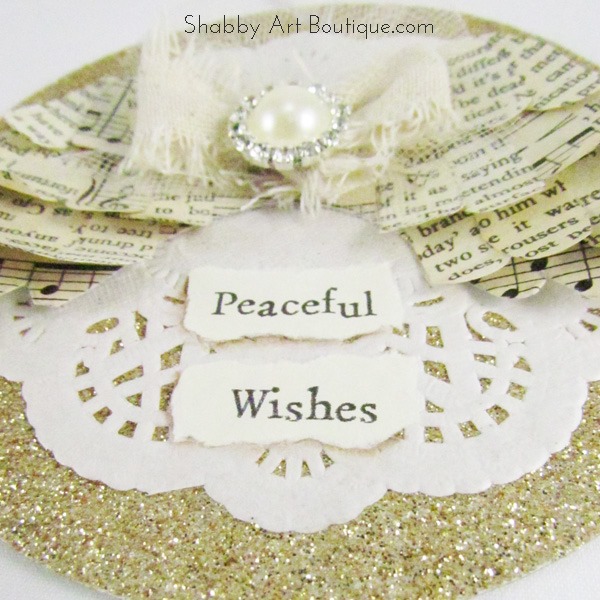
7. There are lots of free typwriter fonts available online. I used ‘Traveling Typewriter’ font to type the words Peaceful Wishes, but you could type any words that are relevant to you. I printed this in various sizes on a piece of cream paper. Next, I ripped the words out, so they had an uneven ‘shabby’ edge. Position your words under the wings and glue in place.
The next step is completely optional, to make the words stand out, I loaded my angle brush with a side-load of Burnt Umber paint and added shading under the ripped words.
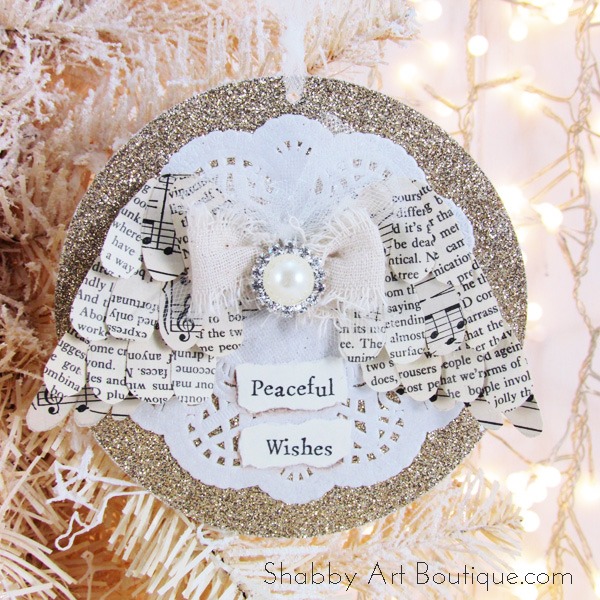
I hope you enjoyed my shabby, vintage Angel Wing Christmas Ornament.
You might also like my book page Victorian Angel ornament

And my book paper birds and star wreath


Don’t forget to come back for my 6th Annual Simply Christmas event…
starting November 1st and running through to Christmas Eve.

Pin now, so you can come back for all the Christmas fun on November 1st.


Now that we have you thinking about Christmas, don’t forget to follow along with the daily offerings in the 31 Days of Handmade Christmas Ornaments.
Here are all 31 Bloggers in order of their appearance over the 31 Days.
Yesterday on Tuesday ~ The Silly Pearl ~ Cupcakes and Crinoline
Celebrating Everyday Life ~ AnExtraordinaryDay ~ All Things Heart and Home
Petticoat Junktion ~ Sew a Fine Seam ~ Creative Crochet Workshop
Shabby Art Boutique ~ Morena’s Corner ~ From My Front Porch To Yours
Pet Scribbles ~ Sweet Pea ~ Dukes and Duchesses ~ Simply Kelly Designs
Town and Country Living ~ One Artsy Mama ~ The Crafting Nook
Our Southern Home ~ StoneGable ~ Love of Home ~ Lovely Etc.
Remodelando la Casa ~ 504 Main ~ Knick of Time ~ Refresh Restyle
The Cottage Market ~ My Uncommon Slice of Suburbia ~ Heathered Nest
Hugs
♥
Kerryanne
I’d love for you to connect with me at:


Follow on Bloglovin
or if you’d like my posts delivered directly to your Inbox
Subscribe to Shabby Art Boutique by Email
If you’d like a private pass to all things ‘shabbilicious, sign up today for my fortnightly newsletter. It contains personal stories, sneak peeks, recommendations, discounts and freebies.


I am totally SMITTEN with your ornament, Kerryanne! I would love a tree filled with ornaments like this.
What an angelic ornament, Kerryanne! Those angel wings are simply divine!
Beautiful ornament, Kerryanne! Love everything about it, especially the book page wings!
This is so beautiful! Thank you so much for sharing 🙂
Those ornaments are so pretty
However I just can’t get started yet on Christmas
which I will be behind all the bloggers if I don’t get started
Beautiful, Kerryanne! I love the vintage look of this ornament.
Another beautiful ornament Kerryanne TFS.
Toni xx
This is so pretty, and I already have pretty much everything already to try.
This would make a lovely card topper for a special person too. Beautiful!
I adore your blog and all the beautiful things you share. This ornament is Simply Adorable and so easy to create. Thank you for sharing and inspiring…Creative Bliss!
I so love these! They are absolutely my idea of the perfect Christmas ornament my friend xo
You know my love for book page crafts, Kerryanne, so you can imagine how my heart flip flopped over this gorgeous sparkly angel wings ornament. I LOVE it!!!!! I’m thrilled that you could be a part of our blog hop. Thanks so much for participating.
Blessings!
This is just beautiful, Kerryanne! Pinned!
so sweet! just lovely Kerryanne!
Love them all! The wings, the angels, the birds, the stars, I’m with Mary Beth, I want them all in my Christmas tree!
The angel wing ornament is so lovely, Kerryanne! I’ve been taking a blogging break, but hope to catch up this fall. Your upcoming Xmas events look wonderful. It’s always inspirational to visit here!
Love it , will have to make more than 1 of these. Thank you Kerryanne
So cute – I love it so much! I really must make some handmade ornaments this year. For my home and for the shop. Love all these great ideas in this group!
Glitter? Book Pages? That’s always a perfect combination! I love these Kerryanne!!
Beautiful! Love it, beautiful glitter!
Debbie
Kerryanne your projects are fun, romantic and practically perfect. My only issues (and I might have already asked this question) but try as I might I cannot find a way to pin your projects and unfortunately my memory is not great. Could you please let me know what I”m doing wrong. I have all your mailings in a separate file in my side bar. Greatly appreciated. Barb
Thank you Barb. I’m glad you are enjoying my projects.
To PIN, simply hold your cursor over the top left hand side of any of my images and a red Pinterest Save button will pop up. Click on that and a pop up window for Pinterest will appear. I hope this helps 🙂