I’m the quintessential list girl…. with a lust for making lists; to-do lists, shopping lists, menu plans, daily, weekly, monthly…. you name it, I’ve probably got a list for it. (It’s weird, I know….please don’t judge me).
So, it’s no surprise then that I’ve been making and using Christmas Planners for many years…. because that’s like the ultimate book of lists!!
Christmas Planners
For over a decade I’ve been sharing Christmas planners here on Shabby Art Boutique and you can expect a new free Christmas planner when Simply Christmas kicks off in November.
But, I also shared a special deluxe printable Christmas planner this week in the October kit for the Handmade Club and that’s what I want to show you today.
It is a bonus freebie that I have included in the kit this month to celebrate the 1st Anniversary of the Handmade Club.

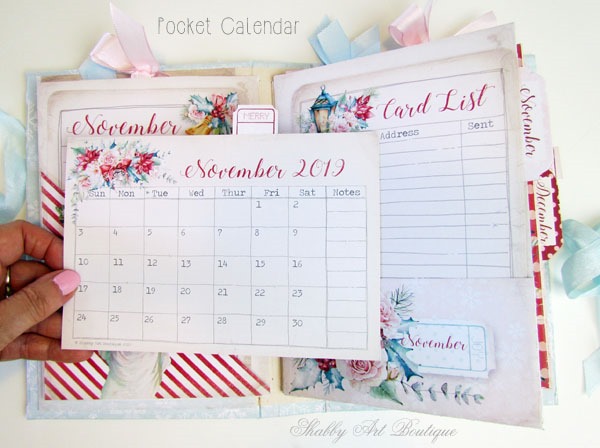
This 2019 Vintage Christmas Planner comes as a complete planner in three PDF files, containing 23 printable pages.
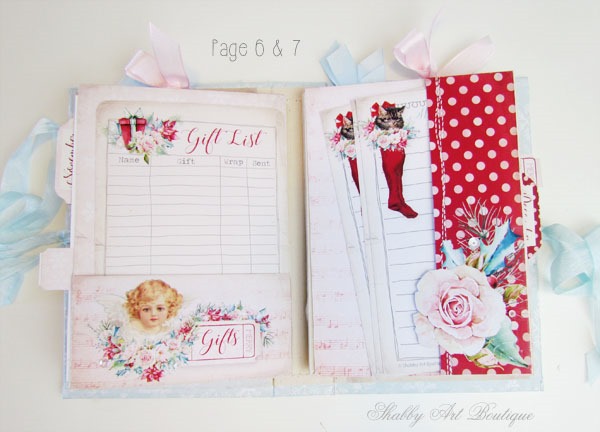
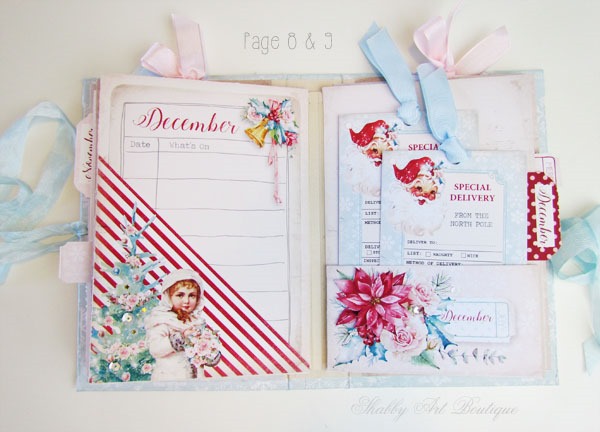
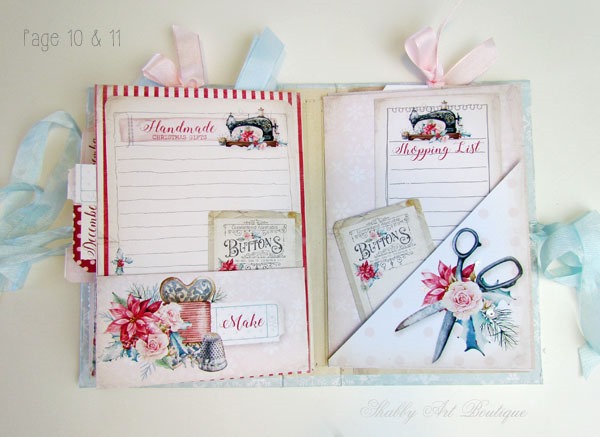
These pages consist of planner covers, decorative pages, pockets, removable card inserts and embellishments. There are many other elements in the October kit that could also be used in the planner.
My planner cover measures 5” x 8” and the six inserts are 5” x 7”. I used a pre cut chipboard cover from Whichcraft Do You Do, but you could easily cut your own or adjust the size of the spine if you wish to add more pages.

As I decided to make the internal pages as pockets, I used a fixed spine.
There’s a very easy to follow tutorial on YouTube for making this type of journal.
Don’t be worried that it is not in English, it has subtitles and is quite self explanatory anyway.

How to make this Vintage Christmas Planner
I used two pages of my blue print paper (joined together) to make a cover for the planner. Once I had assembled the cover I attached the front cover page and the two inside cover pages.
I know a lot of people use double sided tape in their journals, but I prefer to use actual white glue for long term adhesion.

Assembling the six internal pages
The PDF contains 6 double page printables. I printed mine on 250 gram matte photo paper.
This double page is cut out as one whole page… and don’t forget to create a couple of tabs when you are cutting them out – see tutorial on YouTube.
Next, score down the centre of the double page and fold over to create the pocket page. You will end up with six of these.
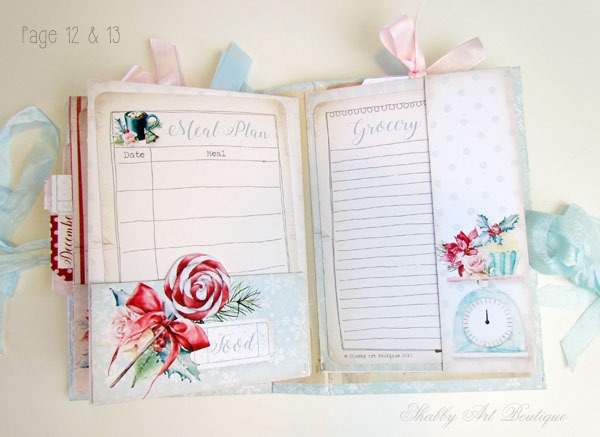
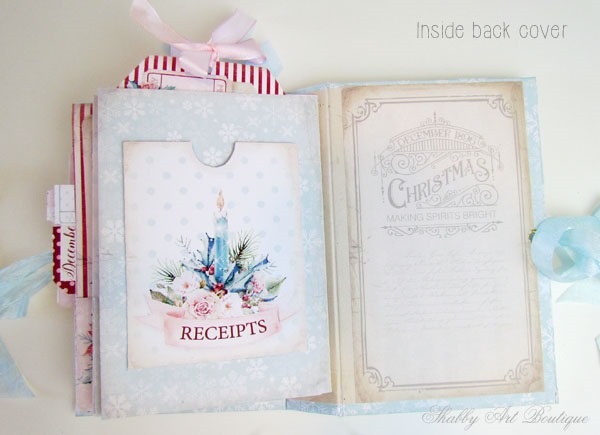
Pockets
Page pockets: On pages one and six, I made the pockets in the top.
For pages two and four I made the pocket opening in the side after I had assembled the planner. I simply ran the knife down the length of the page about 2 mm in from the outer edge, thus creating an opening for a side pocket.
Once the planner was assembled, I started adding the extra pockets. All of these pocket printables have tabs on them. Score tabs, fold over and glue the pockets to the relevant page.
Decorating your journal
Extra poinsettias were included in the PDF and are for fussy cutting and adding as a second layer over the printed poinsettias on page 3 (first internal page), page 5 – November page and page 9 – December page.
On the front cover and throughout the planner I have added lace, small sequins and glitter to add dimension.
I added eyelets to the front and back covers so I could attach a ribbon tie, but this is definitely optional.
The planner, if made correctly with the right sized spine, sits nicely closed without a tie…. but oodles of silk seam binding and a pretty rhinestone button adds to the overall gorgeousness, don’t you agree!
Finishing touches
-
I used a corner punch on my card inserts for rounded corners, which is completely optional.
-
Add journal note cards and pretty embellishments to you pockets. Honestly, you can do whatever you like to make this Christmas Planner perfect for you.
-
Tip: You can re-use your to-do lists and menu planners by laminating them and using a whiteboard marker.
Here’s a flip through of the finished Christmas Planner
The 2019 Vintage Christmas Planner is a bonus freebie with this month’s kit for the Handmade Club. If you’d like more information about the Handmade Club, visit this page.

Happy crafting my friends!!
Hugs
♥
Kerryanne
I’d love for you to connect with me at:


Get instant access to the free printables in our Member’s Only
library by joining my email newsletter subscriber’s list.
I send out two newsletters a month with updates on all things
‘shabbilicious’ at Shabby Art Boutique.
Follow on Bloglovin or join our Facebook group Simply Shabbilicious.


Hi Kerryanne,
I believe is my first time commenting but I’ve been following you for a while now, this vintage Christmas planner is just beautiful! I love everything about it?God bless you,
Blanca M.
That’s so kind of you Blanca, thank you. I’m so glad that you like the Christmas Planner.
I appreciate you following along with my creative journey and taking the time to leave a comment.
Happy crafting,
Kerryanne
Absolutely gorgeous! And how wonderful to ‘hear’ you take us through the pages. xx
Thank you my friend. Sometimes photos just don’t tell the real story and on this occasion video was the best option… but not my favourite thing to do – lol. Hugs to you xx
Oh Kerrryanne this planner is so beautiful!!!! I keep saying I don’t do Christmas crafting, but it’s so tempting when you show us something like this. Thank you so much for walking us through it, it’s really inspiring, even for non-Christmas projects. xx
You might have to make an exception this year Lorraine – lol.
Planners and journals can be made for any time of the year, so perhaps you’ll have to adapt this idea for another project later on.
Enjoy your sewing this weekend xx
I love love love this… This is the first time to join your handmade club…I downloaded everything this afternoon,it is beautiful! I cant wait to start working on my planner. I have lots of people come to mind that I will have to make planners for. One year I made ALL the girls in my life Christmas planners…I would make one then someone else would come to mind, I ended up making 14 planners! Thank you for this kit ..it is full of lots of hard work!
Oh Kandy, I’m so glad you like the October kit. It was a labour of love, but one I thoroughly enjoyed. I hope you’ll share your Christmas Planner when you are finished.
Please feel welcome to join our FB group if you haven’t already – https://www.facebook.com/groups/SimplyShabbilicious/
Happy Christmas crafting,
Kerryanne
Hey Kerryanne,
This is more than stunning thank you so muth!!!!
Gina Belgium ?