You know how I really love vintage things for Christmas…
Well, this year is no different.
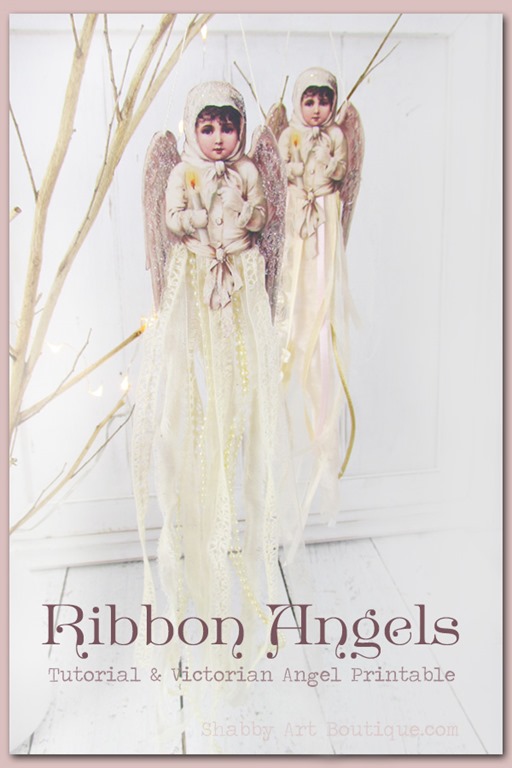
Today I’m sharing my first Christmas project of the season…
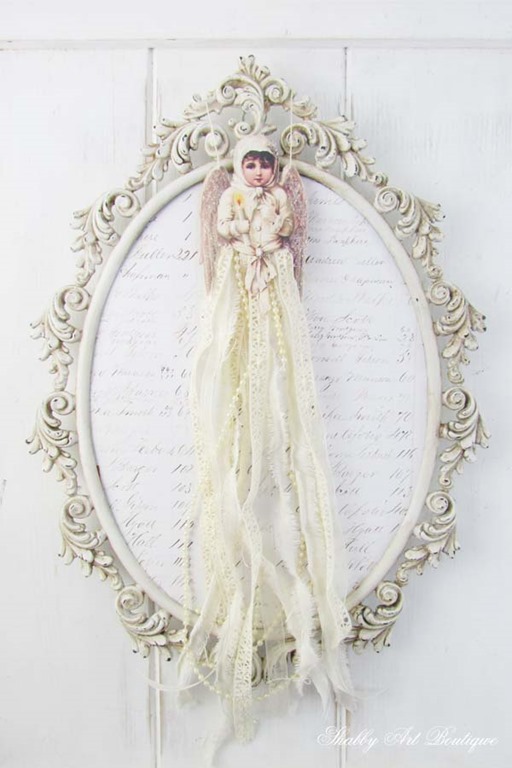
A sweet Victorian Ribbon Angel ornament.
[Don’t forget to PIN]
Once again, I’m joining the 31 Days of Handmade Christmas Ornaments blog hop, which features 30 extraordinary bloggers daily throughout the month of October.

It’s day 18 and my turn to share a handmade Christmas ornament.
I adore these sweet Victorian Snow Angels and thought they’d be so pretty hanging in the Christmas tree or from a door handle or hook.
They are so simple to make too!!

[Affiliate links supplied for your convenience].
Supplies:
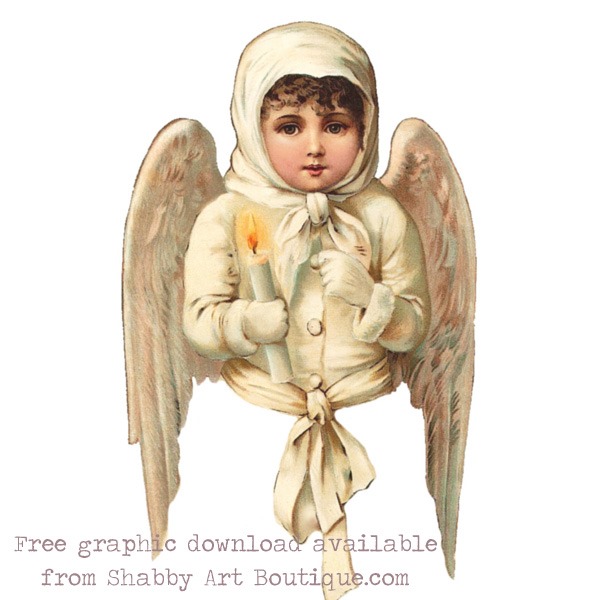
Printable page – download here,
Light card and backing paper (I used vintage book paper, but you could use scrapbooking paper),
Mod Podge/white glue and a brush,
Clear craft glue,
Sharp scissors or craft knife,
A collection of ribbons, laces or ripped fabric,
Needle and crochet cotton to make hanger,
Optional – I also used a sprinkle of German Glass Glitter.
Instructions:
1. Gather your supplies. I used a variety of ribbons, laces and ripped fabrics that I had in my scraps bag, keeping to a neutral colour scheme.
2. Print the download page. I used a sheet of matt photo paper because I like the quality of the print, however, you can just used normal white paper.
Adhere the graphic onto a piece of light card using white glue… as you can see, I used my Liquitex, but Mod Podge or Elmer’s glue are fine alternatives. Press down firmly to remove any lumps or air bubbles. When it is dry, add a piece of music manuscript, book paper or scrapbooking paper to the back side, using the same process.

3. When completely dry, cut out your angel shape using either a craft knife or sharp pointy scissors. Personally, I always like to use a scalpel knife for these kinds of projects. Shown above – front and back views of cut-out.
4. Cut your ribbons and laces etc to desired length – note there is no right or wrong way here. I cut mine to manageable lengths and then trimmed ends when I was finished. Apply a bead of clear craft glue along the waist on the rear view of the angel. Start adding lengths of ribbon and reapply glue as needed. Continue until you have reached the desired fullness.

5. Add a pretty ribbon bow to the back view, to neaten up the top of edge of your ribbon.
6. Piece a hole in the top of each wing using an embroidery needle threaded with crochet cotton. Knot the cotton at the back to form a short hanger.
7. I wanted the extra pizazz of glittery snow, so I applied a light coat of white glue to the wings and in a few spots on the clothing and sprinkled with German Glass Glitter. I like how the glitter picks up the light and makes my snow angels look icy.
I hope you enjoy this fun project!
There are many more Christmas projects on my Tutorials page.
Happy Crafting,
Kerryanne
Be sure to check out all the other Christmas ornaments shown below.
Here are all 31 Bloggers in order of their appearance:
Day 1 – The Silly Pearl :: Day 2 –Yesterday on Tuesday
Day 3 – Cupcakes and Crinoline :: Day 4 – An Extraordinary Day
Day 5 – Knick of Time :: Day 6 – Pet Scribbles :: Day 7 – Simply Kelly Designs
Day 8 – Town and Country Living :: Day 9 – Petticoat JUNKtion
Day 10 – The Everyday Home :: Day 11 – Up on Tippy Toes
Day 12 – Remodelando la Casa :: Day 13 – DIY 180 :: Day 14 – 504 Main
Day 15 – Sum of their Stories :: Day 16 – At Home with Jemma
Day 17 – The Kim Six Fix :: Day 18 – Shabby Art Boutique
Day 19 – Stone Gable Blog :: Day 20 – Morena’s Corner
Day 21 – My Uncommon Slice of Suburbia
Day 22 – Our Southern Home :: Day 23 – Domestically Speaking
Day 24 – The Crafting Nook :: Day 25 – Sweet Pea
Day 26 – Dukes and Duchesses :: Day 27 – Heathered Nest
Day 28 – Lovely Etc. :: Day 29 – Mod Podge Rocks
Day 30 – Running with a Glue Gun :: Day 31 – All Things Heart and Home
I’d love for you to connect with me at:


Follow on Bloglovin
or if you’d like my posts delivered directly to your Inbox
Subscribe to Shabby Art Boutique by Email
If you’d like a private pass to all things ‘shabbilicious, sign up today for my fortnightly newsletter. It contains personal stories, sneak peeks, recommendations, discounts and freebies.
Plus, you will also get a free copy of my eBook, 5 Tips for creating a Shabbilicious Home.

Sign up for my newsletter HERE and don’t forget to confirm the sign up email.


They are so sweet! Alexandra
So pretty, perfect to use lengths of ribbon and haberdashery left over from other projects.
Just beautiful! I love the angel image and all the pretty trims!
So elegant! This is going to be a beautiful addition to your 2016 tree.
Oh my! Kerryanne… this is so exquisite! You are so incredibly talented.
Thank you so much for joining us and sharing your gorgeous angel ornament on the blog hop. 🙂
What a beautiful addition for anyone’s as décor. So pretty Kerryanne – thank you for sharing the download & your idea.
Toni xx
So lovely Kerryanne, thanks for sharing!
Vesna – Home Chic Club
This is just gorgeous, thank you for sharing with all of us!
So beautiful!!! So sweet to offer the free printable!
This is fantastic! These little lovelies are a must-make this holiday season xoxo
They’re so pretty! I love their ribbon skirts, so unique!
I love this sweet ornament. What a lovely tree it would be covered with angel ornaments.
Your little angels are heaven on earth!
What a creative way to work your art into an ornament. Love the ribbon.
These are so sweet!! Absolutely angelic!!
These are precious and so pretty, KerryAnne
Gorgeous Kerryanne! I love everything you make.
Thanks so much for this beautiful ornament tutorial! Definitely going to do this! LOVE!!
Kerryanne
Love your angel, absolutely beautiful!
Debby
Debbygoesshabby.blogspot.com
These are gorgeous! I love the printables and all the lace.
Oh, Kerryanne, these are so beautiful! I can’t wait to make some. Thanks so much for sharing.
By far the best ornament offered. Vintage, beautiful and so Xmassy !
Many, many thanks,
Dan