Once or twice a year I get out my crafting supplies and make a large batch of handmade cards and tags, that will see me through the year.
Last week I went to my card box to find a suitable card to send a friend and was horrified to find the box was empty.
Soooo… this past week I’ve been making all different kinds of cards and tags.

I really enjoy card making. Each card is a mini piece of art and you can incorporate a variety of different techniques to create a varied collection.
Best of all, gifting these card to loved ones is far more satisfying than giving a mundane mass produced greeting card.
Over the next couple of weeks I thought I’d share some of the techniques I used to make my latest batch of cards.

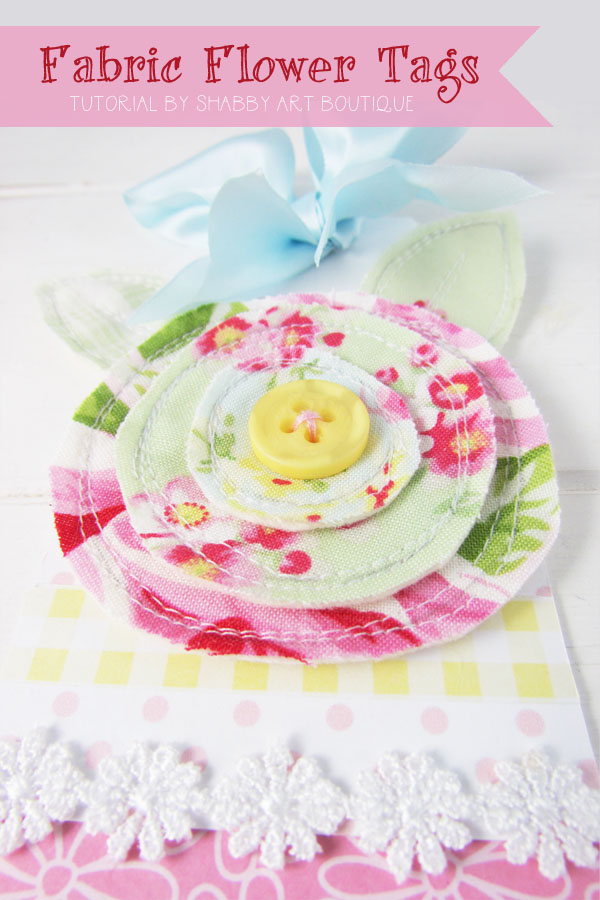
How to make scrappy fabric flowers
Materials:
Scraps of fabric, cream wool felt, scraps of pretty paper, buttons and normal sewing supplies.
Instructions:
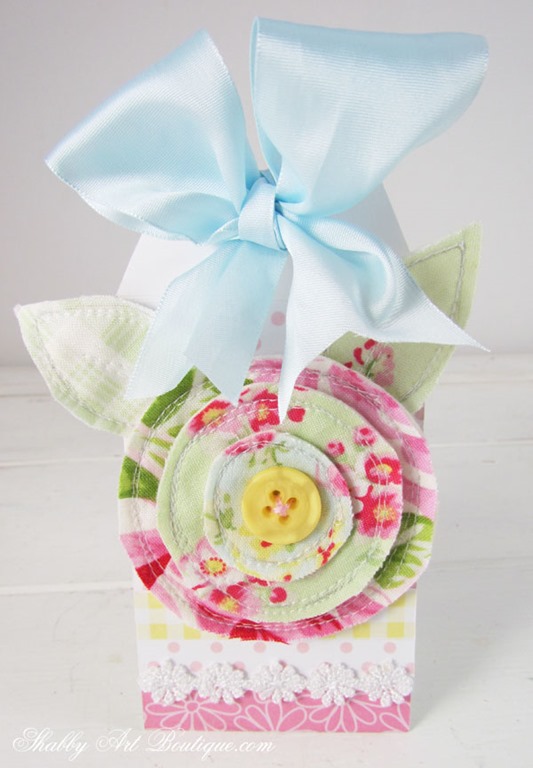
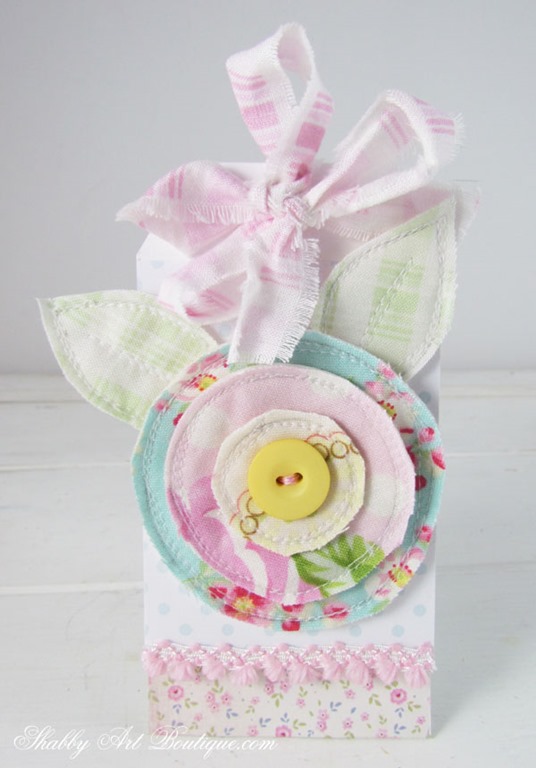
1. I made 3 circle templates from card measuring 6 cm, 4 cm and 2 cm in diameter. I also free hand cut a leaf template. Trace around the circle templates on scrap pieces of fabric with a grey lead pencil.
2. Lay your fabric scrap over a piece of cream felt and using a free motion stitch, stitch around the circle traced line with a sewing machine several times.

3. Continue this technique for your 3 circles and 2 leaves.
4. Cut out your circles and leaves, leaving a 3mm border.
5. Place your 3 circles on top of each other, with the largest on the bottom and smallest on the top. Sew a button on the centre top, securing all three layers.

Make the Tag:
1. To make my tags, I used premade blank cards that measured 13.5 cm x 13.5 cm square. I divided them in half, making two tags, that opened like a card.
2. The fold in the card was across the narrow width. I scored a line across one side, 2 cm down from the fold, so that the front of the card could fold up for a message to be written inside. I popped a small amount of glue inside the card between the fold and the scored line to secure it.

3. I used a hole punch to make a hole in the centre top and I cut angles on the outer corners to make a traditional tag top.
4. In image #4 you can see how the front of the card can fold up.
Decorating the Tag:
1. I cut 2 cm off the lower edge of the top panel of the tag (pink polka dot). This allowed the bottom panel to also show. Using a variety of pretty papers, I decorated the front of the tag and also added a 2 cm border to the lower panel. Gosh… I hope that made sense??
2, Next I added a ribbon or fabric ribbon bow, tied through the hole in the top. I also added some pretty trim to the lower edge of the top panel of the tag.

The finishing touch was to adhere the scrappy flower and leaves to the front of the tag.
The two tags shown are bright and cheerful with their pretty cottage colour mix, but you can make these scrappy fabric flowers in any colour combination from bold to pastel.
I think you’ll agree, these pretty handmade tags are much nicer than a mass produced generic kind of card and perfect to add to your decor or pin to a mood board.
They are kind of a gift in themselves!!
Pin for later…
I’ll be back soon with more fabulous card making techniques!
Happy crafting!
Hugs
♥
Kerryanne
I’d love for you to connect with me at:


Follow on Bloglovin
or if you’d like my posts delivered directly to your Inbox
Subscribe to Shabby Art Boutique by Email
If you’d like a private pass to all things ‘shabbilicious, sign up today for my fortnightly newsletter.
It contains personal stories, sneak peeks, recommendations, discounts and freebies.


I love creating with scrap fabric–thanks for sharing this sweet idea!
You have to love a creative project that uses up all the tiny fabric left overs Twila!!
These are so fun, Kerryanne. Thanks for sharing your idea.
They are definitely fun and super easy too Elaine. I love these scrappy fabric projects where you don’t have to be perfect. It’s all about enjoying the moment. xx
I like these – thanks for sharing.
You are most welcome Kate. Hope you have fun making some 🙂
Oh Kerryanne, I love these, who wouldn’t want to receive one? I was thinking I could use my pinking shears to cut out circles after being sewn, just for decorative edge on some. These are so pretty and sweet, think they show caring. Can always count on you to show us a wonderful gift to make, thank you for sharing this and all projects you share..
My sewing room is cleared out enuf for me to get in to sew on my machine now. still have lots of organizing to do but can be done in between projects. Will need to get another folder to keep all projects I print out from you, all lovely things can make as gifts and/or for our home., I especially love style of your projects.
Have wonderful weekend.
Yes, yes, yes JaneEllen. The pinking shears idea is perfect…. how lovely that will look!!
Nothing like a freshly cleaned sewing room to get your creative juices flowing. Have fun my friend xx
Dear Kerryanne
Your homemade cards are so beautiful. Who wouldn’t love getting one of those. You are really so creative and inspiring.
Thank you for sharing.
I wish you a wonderful weekend
Hugs and blessings
Lone
Oh wow… thank you Lone. I’m thrilled that you are inspired by my project.
May your weekend be filled with creativity!! xx
How do you suggest mailing these? I would think a padded envelope if you aren’t delivering by hand. Any other suggestions?
Definitely a padded envelope of even a small postage box Fonda. They do flatten out nicely if you shape the bow, so could be put in a normal envelope. Enjoy!!
So sweet, thank you for sharing!