The presence of candles creates the magical, soft glow that transforms any room into one of mystique. They create an ambiance of comfort and fantasy… and isn’t it true, that everyone looks better by candlelight!!
It’s no secret: women love candles!
We do… well, all the women I know love candles.
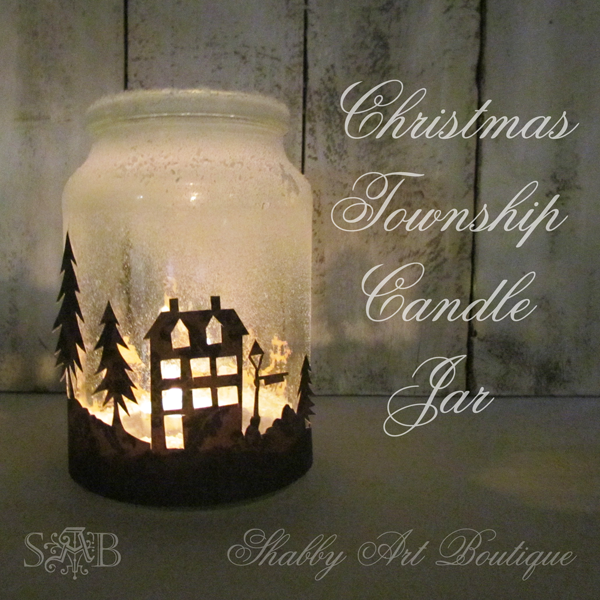
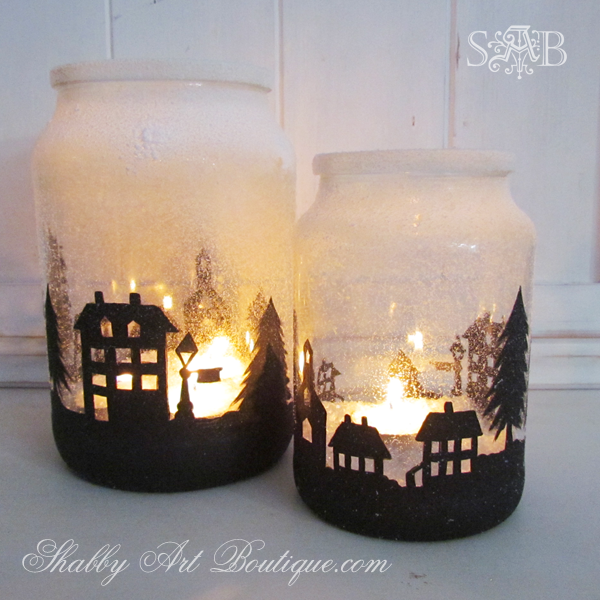
And I’m tipping there’s a bunch of women all over the world that loved my Christmas Township Candle holder last year…
Because that baby went viral!!
I’m not sure why…. it was just a coffee jar that I prettied up.
In fact, I made quite a few of them to use for an outdoor dinner party and they were all slightly different townships.
The problem was… I only intended to share the candle holder as inspiration for others. I explained briefly in a blog post HERE how I made it, but I didn’t supply a template. I didn’t actually have a template!!
I made each of my townships by hand… first drawing the design and then cutting it out with a scalpel knife. One of my friends asked me why didn’t I use my Silhouette?
It’s as simple as this… it was a hands on ‘plan as I go’ kind of project that I didn’t think I’d be blogging about later.
Throughout 2014 I’ve been inundated with email enquires; What jars did I use? Where can I buy the jar? Where’s the pattern? Why didn’t you supply a pattern template etc…. plus lots of crazy questions that defy logic, but they did give me a laugh.
So here’s the 2014 new improved
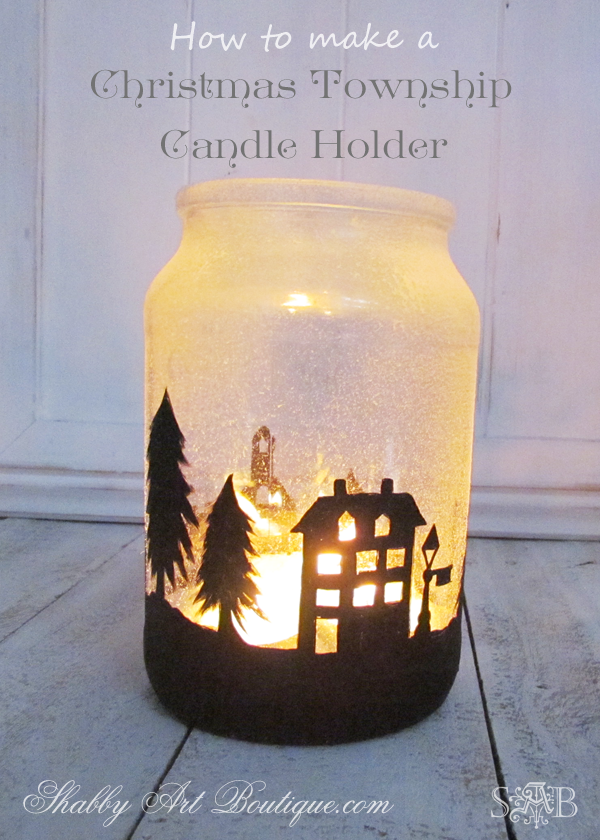
Christmas Township Candle Holder
with a pattern and two ways to make it.
This post contains affiliate links, which I may earn a small commission on
and I will undoubtedly spend it on more craft supplies for SAB.
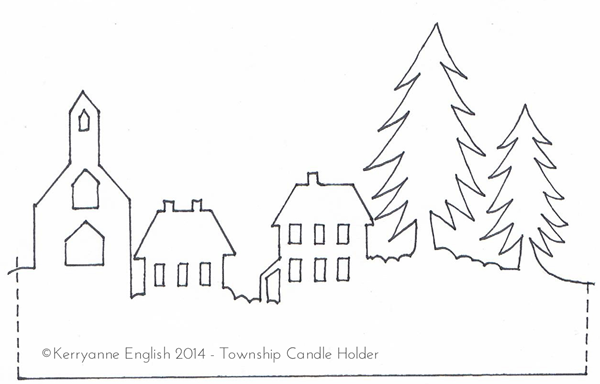
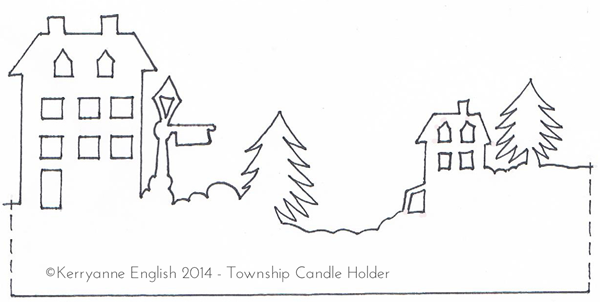
Township Candle Holder Template
The template I’ve provided below can be used to either cut out a paper surround for your jar using last years instructions for a paper surround…
Or, you can use it to paint the township onto the outside of the jar using the instructions further down in this post.
To save the images, simply click on the template photo below to open at actual size in another window. Right click and save to your own computer.
To resize your template, open the template image in a Word document. Measure your jar to determine the perimeter circumference (outside jar for cut-out and inside jar for painted project) and enlarge the two parts to meet that requirement. Join part A and part B together to make one long template.
Frequently asked questions:
What size and type of jar did you use?
I used Mocona coffee jars in different sizes, because that’s what I had on hand.
You could use any kind of recycled glass jar, vase or even a wine glass. The template can be adjusted to fit.
If you spray the Santa Snow on the outside, won’t it rub off?
Yes it will. I designed these illuminated candle holders to be a feature on a dinner table for one night, however, we have used them multiple times and they still sit in my cupboard waiting to be used again and the snow is still intact.
I designed this project for my own use. It wasn’t my intention to design a project for others to make, so they could post it as a gift or let their children play with it. This is one of those DIY projects that is meant to be looked at and admired.
Note: I’m adding a wire hanger to my township candle holders this year, so I can more easily move them around.
Couldn’t you spray the Santa Snow inside the jar?
Santa Snow may be flammable, so I wouldn’t spray it inside the jar where a naked flame will be used. It would be okay if you were using one of those flameless battery operated candles.
Also, please DO NOT put the paper template inside the jar!! I’ve had so many emails about this. My instructions do clearly say “wrap it around the outside of the jar”.
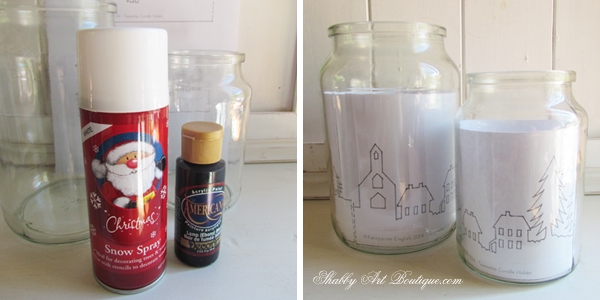
Materials
Glass jar,
DecoArt Americana acrylic paint – Lamp Black,
Small round paint brushes size 2 and 4,
1/4” flat brush,
Can of Santa Snow,
Wire for handle (optional),
Isopropyl Alcohol Spray and clean cloth.
Instructions for making painted township
1. Clean jar with soapy water and remove any labels.
2. Wipe outside of jar using Isopropyl alcohol spray to remove any residue and then avoid over handling jar.
3. Measure the inside of your jar using a scrap piece of paper. Make your template to fit this measurement and then insert inside of jar. I used a little piece of cello tape to hold it in place, so it wouldn’t move while I was painting it.
4. Rest your jar on a soft cloth – I used and old tea towel. Try not to handle the bottom of the jar too much as grease from your skin may affect how well your paint adheres to the jar. Using your small round brush and the black paint, start painting the design, using the template as a guide. You may decide to add other things or trees… I actually added a little fence beside the church on one of my jars.
5. The first coat of paint will be patchy… that’s okay. Leave it to dry and when you paint on the second coat it will be opaque. Set aside to dry.
6. If you are going to make a wire hanger for your jar, add that now.
7. Place your painted jar inside an old cardboard box and lightly spray the top third of the jar with the Santa Snow. Do not spray inside the jar. Leave to dry.
8. Last year I added Epsom Salts to the top of my jar for an added effect
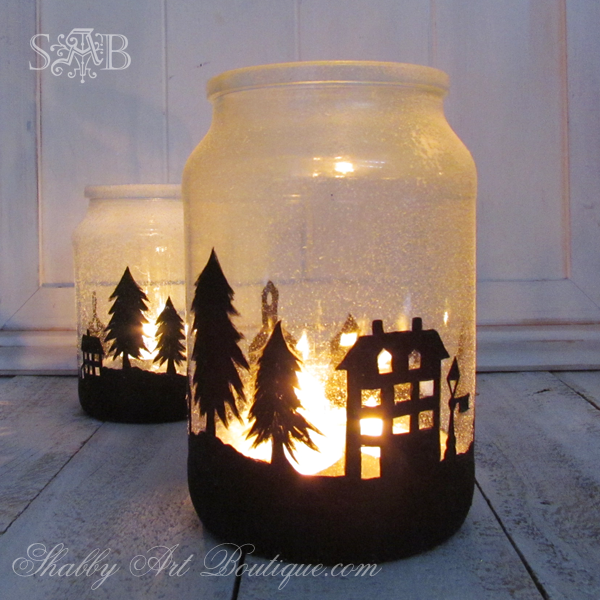
8. Insert tea light candle/s. I used 3 candles inside my larger coffee jar.
If you are making your own Christmas Township Candle holders, I hope you enjoy yours as much as my friends and family enjoyed mine last year.
If you enjoyed this post, make sure you check out my free Tutorials page with 250+ projects and free printables.
Happy Christmas crafting,
♥
Kerryanne
I’d love for you to connect with me at:
Follow on Bloglovin
or if you’d like my posts delivered directly to your Inbox
Subscribe to Shabby Art Boutique by Email
If you’d like a private pass to all things ‘shabbilicious, sign up today for my fortnightly newsletter.
It contains personal stories, sneak peeks, recommendations, discounts and freebies.
These tags are FREE to download for Newsletter Subscribers.







I loved this when I saw it Kerryanne – thank you for sharing the “How to”.
Finally sorted out a new printer and have printed out my planner – I also have a number of blogging friends that have paid you a visit to download the planner and they all say how lovely it is.
Toni xx
I didn’t ask….but I wished, lol! Thanks for making my wishes come true! You could also cut this out of black construction paper or cardstock and wrap around your jar…..Just love it..Thanks again for the pattern and the tutorial!
Hi Marilyn,
That’s exactly how this project started. I cut the silhouette out of black cardstock and attached it to the outside of a coffee jar, but everyone wanted a template and some people thought they couldn’t cut out the finer details…. so a painted version was born.
I hope you enjoy making this project ~ Kerryanne
SOOO excited to try this, thank you for the template! Have a wonderful week!
Thank you so much for sharing the template. Your project is absolutely fabulous!!
je trouve cette idée superbe, j’ai bien tout lu et finalement c’est pas si compliqué que ça, juste être bien précise ! je pensais aussi le faire avec une bombe
givrée, à tester ! merci pour toutes ces explications, j’ai partagé sur ma page FB ! bonne semaine, amitiés de France ! Ladyfée
do you spray them after painting with any sealant or anything to keep the paint from coming off?
Hi Shannon,
No I didn’t seal them. If you rub the Santa Snow it is going to come off, but I found that once dry it kind of hardened and has been quite durable. This project was intended to be used just for a special occasion or just for a limited time. If you wanted something more long lasting, I would suggest using a splattering of paint for the snow effect.
Hi Kerryanne,
I live in south of France. I just find out your christmas township in a jar and I love it! I create table scenery and you inspired me, thanks a lot!
Oh how lovely to live in the south of France Myriam. I’m sure that must be so amazing and I’m glad that I have been able to inspire you 🙂
Can you please explain what the epsom salts are for? And where to put them?
Thank you!
Hi Alicia, Epsom Salt looks like snow, so it is often used around the base of candles. 🙂
Thank you Kerry! I’m so looking forward to making a few of these this year!! Xxxxx
Love this! I have some great glass vases that I snagged at the Dollar Tree years ago. Yesterday I found some smaller vases that will fit inside. My plan is to cut the design with my Silhouette and then sandwich the paper between the vases. That way it will be on the inside, but won’t pose a hazard with the flame.
Great idea Heather!! 🙂
Hi I love this…..been thinking of how to seal the snow on the outside……do u think a clear sealer spray would work???? Beautifully done 🙂
You could try using a spray sealer Tiffany. I think what you have to remember, is that Santa Snow is not intended to be permanent, so it will not adhere to the surface like paint would. If you want a more permanent effect, I’d try fly specking white paint with a toothbrush, intensifying the amount at the top of the jar and decreasing the amount of flyspecks as you move lower towards the township. 🙂
For a mist look you could etch the upper oration of your jar. The process is quick and easy with glass etching cream.
You certainly could do that Min. I’m sure there are many different things one could do…. this is just what I chose to do on mine for a quick project. 🙂
Thank you for sharing this lovely tutorial…. I discovered you through Pinterest, but not in a good way. The folks at “diyandcrafts” have placed their logo on top of yours! See the pin here: http://www.pinterest.com/pin/456130268482825745 (pin number – 456130268482825745)… I’ve had similar problems. For some people free isn’t good enough, they have to steal it… I will pin from your blog and hope others will find you.
Thank you Lillian… and welcome to Shabby Art Boutique. I appreciate you pinning directly from the source. I already knew about this blog using my project and redesigning my photos to make a collage. Annoys me that they just used my blog post without asking permission or even telling me. Thankfully there have been creditable people who have pinned and shared this post the right way and lots of people are seeing it. I hope you enjoy making one of the township candle holders. 🙂
You are welcome… did you see the comment I put on the offending pin?
I love this tutorial. I live in Zimbabwe, so a snowy white Christmas is what we only dream about. I can’t wait to make these for our table this year, they will look fantastic, thank you so much for all the inspiration.
Lindas lanternas!
Adorei a idéia. Vou aproveitar os vidros que tenho em casa.
Thank you for this brilliant idea was struggling for ideas and im not great at drawing especially free hand my hat goes off to you for you’re inspiring ideas have bookmarked youre page and shared it thankyou again
I LOVE this idea!!! Thank you for sharing!
Thank you for sharing this great tutorial…I found your site from Country Living Magazine and am so glad I did. I have already signed up to receive your emails and can’t wait to have the time to go back and read all your other posts. I live in the United States and am always on the lookout for great ideas. I don’t have a website but I will be telling all my crafting friends about your great website. Keep up the great work and have a wonderful holiday season.
I’m from Brasil and I’d like to tell thank you for sharing,its wonderful,i really love it,congrats and have a beautiful Christmas.God bless you and your family 🙂
Thank you Kelly. May you have a blesses Christmas too xx
I love this! It’s fun when you do stuff all the time, but someone comes along with an idea & it’s like “wow” why didn’t I think of that before; especially since I paint on everything lol I use to do the fake glass etching on jars too. 🙂 Thanks for the inspiration.
Sometimes it’s the simple things Beth – lol. I also have a pattern on my blog for my Halloween candle jar… seeing you like painting on jars. 🙂
Just found your site via Mr.Finch,you have some great ideas.I’m certainly going to try the Township Candle Holders.As I am spending six weeks in Australia, over Christmas,I shall have to make sure,my family out there, save some jars for me.
You can be sure, I will be telling, all my friends, of your site, and I look forward to seeing more of your work.
Yours with thanks and admiration P.A.Morris
Thank you Pam. I hope you enjoy your Christmas spent down under. It’s going to be a hot one for you.
Merry Christmas ~ Kerryanne
Dear Kerryanne love your products
Do you have step by step videos
We are very interesting in your township candles
Your instructions are very nice but I am interested in seeing this done on a video if possible and I think others would really appreciate it too
Thank you
Laurie Meyer
Thank you Laurie,
Unfortunately, with running two businesses I’m just lucky to get any creative time these days. Photos are a bonus, so there’s little chance of a video I’m afraid…. but I’m glad so many people have enjoyed the free tutorial and template. 🙂
Hi Laurie,
You have created a mini sensation here with your lovely coffee jar towns. They are lovely and I for one am going to try and give it a go.
Thanks for your inspiring ideas and I wish you a wonderful Christmas. When you sit down to your table on Christmas Day just stop for a moment and think about how many people will have your ideas throughout their homes this Christmas….that is something very special….well I think so anyway 🙂
Best wishes and may you have a wonderful Festive Season
Rozanne Winter
Such lovely words Rozanne. I appreciate your sentiment and thoughtfulness.
May your Christmas be blessed and filled with joy too.
Kerryanne xx
Kerryanne these are SO pretty I just have to try them – you are so generous in creating a tutorial for everyone, never mind the template. I’ve lots of jars of all sizes – I find it so hard to recycle jars when they might come in useful! And, yes, they have come in useful! 🙂 Happy Christmas from Wales – Nadolig Llawen!
Thank you SO much for sharing the template and instructions for this lovely township candle jar. I know it took a LOT of time to create this and then even more time to provide the template. I love it, have pinned it, downloaded the template, gathered my supplies and hope to get started on this tomorrow. I have one question. You mentioned making a wire hanger. Is there a photo or any information about how you made the hanger? I have read and reread both posts and if there is more info I am overlooking it. Are you wrapping wire around the rim at the top? I apologize for taking more of you time. Again, thank you for sharing. Blessings!
Thank you Patti. How you make the hanger will be dependent on what sort of glass jar you used. The ones I used had a lip on them, which meant that I could loop a piece of wire around the neck and attach a piece of wire to is as a hanger. If you use a vase or flat faced jar it wouldn’t be possible to attach a hanger, but the jars look lovely without them too.
I hope you enjoy making the candle jar 🙂
Hi there
Fantastic idea totally had fun with this, I did the snow effect a little different and used modge podge with a toothbrush as you suggested for pain and then sprinkled over white fine glitter made a beautiful effect, also did another with window spray for blocking peoples views (cant remember the name or locate the can lol) both had a fantastic effect. was able then to seal the jar with modge podge, also used wood adhesive which works really well on glass as dries clear.
Thank you again
Rose xxx
They sound amazing Rose. I hope you’ll link them up at Shabbilicious Friday so we can all see them 🙂
When I first saw this I didn’t know that the template was included and read the comments of others asking for one. This was such a beautiful idea that I was going to try it – make only one as a gift for a friend. But I now see that you’ve included a template and will be making quite a few – even one for me!!!! Thank you!
Hello,
Was so inspired when I saw your original pin on Pinterest but not being crafty in anyway, I just knew I would not be able to create and cut the silhouette. I read through every comment posted to see if there were any suggestions (surely I was not the only one intimidated by the silhouette
Thank you so much for taking the time to share this and answer questions! I bet you got a zillion emails!! LOL thank you sooooo much!
Kim
Thank you for this idea. I plan to personalize each one I make as a gift ,to match the person’s home.
Can you say how you added the Epsom Salts to the rim? Thank you!
Hi Peg, I just added some Mod Podge or white glue to the rim and dipped it in Epsom Salts. 🙂
Do you think instead of the spray snow that some mod podge & some fake snow or the Epsom salts could be put on the outside of the jar?
Geraldine, my candle jar is just an inspiration and the instructions are how I chose to make mine. Please feel free to try other alternative applications. I think Epsom salts would proably work well, but I’ve not tried it all the way down the jar.
I had planned to make one of these this year anyway, but have just noticed you did an update with template! Thank you so much 🙂
Thank you so much for sharing the template! I´m gonna do it today, can´t wait…:)
Thank you so much for the template!!! Can’t wait to try this out one weekend soon!
Hello I am from Greece and I found your christmas township candle fantastic!!!! I’m gonna try this project and I would like to share with you that decoart has a paint product called frost enamel thas gives the snow effect…Thank you sooooo much for sharing your idea with all of us…. Merry christmas xoxoxo
Hi Loanna,
I’m glad you like the Township candle holder. I do know about the frost enamel, as I’m a DecoArt Helping Artist and I stock and sell the DecoArt products. You could certainly try that, but it doesn’t have quite the same effect as the Santa Snow…. but it all comes down to personal choice. When I made this candle holder it was never with the view of it being a permanent item or having it go viral online, so if you wanted a more permanent item the frosted painted would be perfect.
Happy painting,
Kerryanne
Is it possible that you could spray a light coat of matte spray on the outside of the jar (like spray varnish) an it would help the paper or painted scene and the snow to stay on longer? If I remember correctly, I have done this to wine glasses and vases that I have painted and turned into Santas an snowmen.
Yes, you could do that Sherry and it should help keep it all together. 🙂
Very nice, and thanks for the patterns.. It is possible to make the “town” with black vinyl instead of cardstock? They are really pretty 🙂
Best wishes from Norway 🙂
Una idea genial, me encanta. Feliz Navidad
this is a great idea. I plan to do it for Christmas. Thanks for sharing this lovely tutorial.
Hope you enjoy making the townships as much as I did Chanelke.
I have just found this beautiful candle decoration. Thank you. I love silhouettes and candles in jars. So, this is perfect. I hope to make a few for our Christmas table.
I’m glad you like it Helen and hope you have fun making it.
This is so pretty – I am not artistic at all, but tried the painting using the template on the inside and it didn’t turn out too good. Now I want to try the black paper on the outside but sure wish I could figure out how to turn the black on white template to a white on black so I could print the template out on black paper and just cut it out. I am sure if I was better at the computer I could figure out how to make the white ink print instead of the black, sigh, I will keep trying….
I just wanted to say thank u for ur tut and template. I have stage 4 bone cancer and its terminal. I am bedridden now, but i still have a mind and use of my arms and hands. THIS is what i chose to do this christmas to give all the members of my family and friends, so that they will have something to remember NANA by. Thank u for sharing this, I can now leave something for generations to come…{.Every christmas they will think of me}.. GOD BLESS U AND UR FAMILY AND KEEP U ALL SAFE THRU THE HOLIDAYS AND MANY YEARS TO COME….. love to u all and MERRY CHRISTMAS, Brenda
p.s. do have jars like this for the other holidays thru out the year? Thank u again. Brenda
Thank you so much Brenda. I’ve sent you a private reply 🙂
Love this Christmas Candle. Definitely going to make some, but, instead of candles, flame-less or real. I’m going to put white/clear Christmas lights (battery). Depending on the size of the jar 25 or 50 count light set would work perfect.
Thank you again, Julie Ann **** 🙂
I LOVE this, but Santa snow wipes right off. Is there a way to make it last on the jar forever??
Hi Melissa, as I said in my post, this was a one off project for a special event. I didn’t need it to last a long time… perhaps if you want something more permanent you’ll have to use an alternative product. 🙂
ah ok! thank you very much 😉
I love it 🙂
Thank you so much for the template and tutorial for making this wonderful candle holder.
I made one myself now for Christmas.
Greetings, Wies
Great project! It is truly beautiful. I attempted to do it today and used the painting technique. It looked great… until I sprayed the snow. It ended up dripping down onto the painted part and made the paint (which appeared dry) to start sliding down the jar. It wasn’t like the paint was running, pieces of the houses and windows just slid down. The whole thing was ruined. 🙁 I ended up washing the jar off and I will try again tomorrow. Now, I am not an experienced crafter or painter and so I am hoping you could give me some tips on how to do it right. I thought about spraying inside the jar and using a battery operated tea light instead of a real one. I would love any more suggestions though. Thanks!
Hi Jen,
Oh that is disappointing for you. It sounds like the problem lays with your Santa Snow application. I gave the jar a very light misting that wasn’t opaque, so not enough to make it drip. Also, I only sprayed the top third of the jar and the painting was in the bottom third. If you held the snow can too close to the jar and the snow application was concentrated in one spot, it would also drip. I’m not sure spraying the snow inside the jar would give the same look.
I hope you try again. Remember to hold the can upright and just lightly mist the top of the jar. Keep checking you progress and if you need more snow, add it a little at a time.
Good luck 🙂
Thank you for sharing this beautiful work. I did it for Christmas and really enjoyed the result, although it was not as beautiful as yours!
What a lovely idea. Just when you think you have seen everything.
Exactly what type of paint brush did you use? Your instructions said a “round” paint brush.
What a clever idea! These are on my “must do” list for this year. It’s hard to find Christmas decorations diy that are this sophisticated. And they shouldn’t cost that much to make, either. Bonus!
I see a Christmas village in my future.
Thanks so much for posting your fab idea!
Thank you so much for sharing the template……..I cannot draw to save my life. These look beautiful and I will be making some for my family
i love your jars….they will be decorating my christmas house this year in Ireland..thank you for the inspiration
Hi kerryanne. I’m from indonesia. I really like your christmas township candle. I will make it for christmas next month and love to share on my fb ^_^ . can’t wait till next month.
Thankyou for sharing.
Thank you so much for sharing this!!! I will so enjoy painting on some jars this year, I will use glass paint I think then I can fill the inside of the jar with chocolates, truffles and fudge – double delight!! 🙂 xxx
Going to try this soon. What a great gift.
Thanks for sharing this idea with us Kerryanne. I only found it today on pinterest when looking for ideas for making christmas decorations.. Very pretty and very effective. I shall be having a go at this for this christmas
kerryanne,what a beautiful idea,i love it can’t wait to make one,i’m going to a craft show this weekend,wish me luck.
I can’t seem to find Santa snow… Any suggestions on where to buy? Thanks!!
I got some this week in a discount shop here in Australia and I also saw it on our local supermarket. Hope this helps 🙂
I was thinking about making a few of these but the time it would take to keep painting them..was wondering if it 2as printed on heavy paper and cut out if the cut away could be attached to jar and use spray paint instead..and adhere pieces of tape for Windows so I can remove the tape for light to cone through
How come when I apply the second coat its taking the first coat off?
Hi Christianna, this will be due to your application most likely. Was the first coat completely dry before you recoated? If it was, then it may be an issue with the type of paint you used. Cheaper craft paints don’t always paint over glass all that well. I hope this helps you 🙂
Just wanted to thank you for this beautiful idea. Having recently retired I now have some fun ideas to fill my days, I have started on this project but have found my cheap paintbrushes aren’t quite up to it so am investing in some smaller detail brushes. There are so many beautiful ideas available here, I can’t thank you enough for sharing. You are a very talented lady.
I made three of these, and love them! But now I know why you might want a handle! 🙂
So, how do you attach the wire?
Love this idea, but wanted to make it a more permanent decoration. Here is how I tweaked it:
I bought and used the santa snow, but didn’t realize that it wipes right off. With kids and grandkids around, this wasn’t the best option, so after painting, I sprayed the jar with clear lacquer, then sprinkled with regular salt. When dry, I sprayed another coat of lacquer to set the salt.
I also had my son drill a hole at the bottom edge of the jar and inserted a small strand of white lights.
Thanks so much for posting this – I even made some for Christmas gifts, and now I’m going to experiment with wine bottles.
Do you paint the bottom of the jar as well?
Thank you so much for a wonderful tutorial and sharing your great template. Can’t wait to get started. Thank you again??
love your site just discovered it when you make your own pictures like you did your xmasscent and you print out a design then do you put it on black construction paper or do you just use printer paper and paint it black as i want to make a kids scene and print out so if youmake halloween fall or anything you always paint the scene black or not im a good crocheter and knitter but just been learning about jars stuff a week por two ago
you are so talented could you possible email me thanksw
forgot to ask you as jusst asked a question can you use sharpies that you get at walmart not markers but they are called paint sharpies could you email me thanks so so very mcuh
Mis felicitaciones, y agradecimiento por lo que compartes, recien voy a empezar a realizar este maravilloso arte que compates con nosotros, mil gracias y mucha suerte
WHAT A WONDERFUL PROJECT YOU CREATED !!! THANK YOU SOOOOOO MUCH !! I,M JOIING YOUR SITE…. TODAY..
Your instruction says this: and then insert INSIDE of jar. I used a little piece of cello tape to hold it in place, so it wouldn’t move while I was painting it. But on your FAQ you said: DO NOT put the paper template inside the jar!! I’ve had so many emails about this. My instructions do clearly say “wrap it around the outside of the jar”. So which one is it?
Hi Mags, I think you are confusing the two different projects. The original post about the township candle jar was for a paper cutout of the township that was placed on the outside of the jar, so that if you used a real candle it wouldn’t catch on fire. For the painted jar township, you need to place the pattern template on the inside of the jar so it is visible while you paint the outside of the jar. The painted version was offered as an alternative to the paper cutout. I hope that all makes sense 🙂
i have loads of tea candles, and now they will be put to use! love your awesome creation! ♥
Thank you for revisiting this project. I love this version too.
I absolutely love this idea! I’m about to try it out myself. Thank you for posting this!!!!
Hi Kerryanne, thanks for this lovely idea. Can I ask how long it takes to do it?
Hi Aimee,
I made a large group of the township candle holders when I made mine, but still made them all within an afternoon. Cutting the template takes the longest, so if you are doing a few, I’d do that step all at once.
Hope you enjoy making this project!!
H Kerryanne,
Love this project ! Do you know how many cans of snow I would need to coat 30 jars?
Hi Renee, in my experience, Santa Snow varies from brand to brand and some have a lot of snow in them and other cheaper brands, not so much. With my jars I remember spraying quite a few jars with the one can of Santa Snow. It’s only really a light dusting that you give the top of the jar. Enjoy!!
Hi. Thank you for posting this and having the patience of Job for responding to all the questions!
I love this project and will be using it for our Women’s Ministry craft project for next month so we can enjoy it the entire month of December. Thank you again for sharing it!
I just LOVE this!!! Could you or have you ever thought about doing the nativity scene as a template? If so, let me know! I’d love to make them for my church ladies! Thank you!
Thank you for sharing not only your idea, but all of your posts , which answered so many questions, and added ideas. I hope to do this with my daughters and I know we will LOVE IT.. I loved reading all the comments. Thank ufrom the NewJersey shore