I’ve been in my new craft room a little over 3 months now and I’m still making a few tweaks here and there.
While I was working at my main craft table last week, I looked over at my sewing corner and decided it needed something different.
Something wasn’t working for me. I sat on that idea for a few days…. pondering what I would change.
As it turned out, the answer presented itself when I unpacked a box of embroidery hoops.

My quest this year is to try and use my own supplies before buying new ones…. because as I discovered when we moved, I own an obscene amount of art and craft supplies.
So I looked at the box of embroidery hoops and then at my sewing corner wall and I knew right then and there that I needed a wall of embroidery hoop art…. AND what could be more perfect for the wall of a sewing corner.
For my first embroidery hoop project, I decided to combine fabric and paper crafts to make a mixed media piece with a difference.
How to make Embroidery Hoop Art Using a Printable
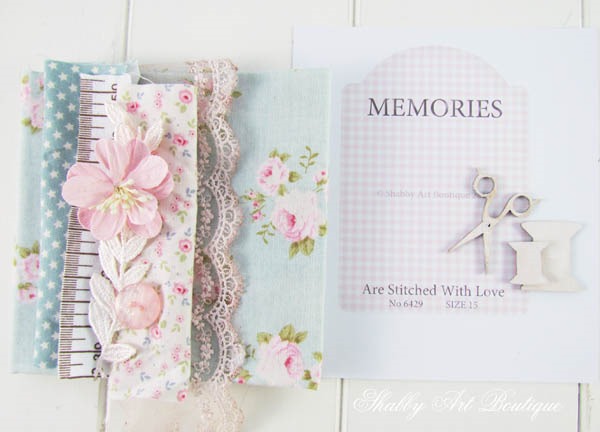
Materials
-
I rummaged through my scraps box for all the bits and pieces in this project and used off cuts and scraps of lace, torn fabric, ribbon, a flower and a couple of buttons.
-
Piece of backing fabric for hoop.
-
I added in small chipboard scissors and cotton spools.
-
7” embroidery hoop.
-
free printable button card – see note.
-
clear glue.
Note: the free printable button card graphic I used in this project is available in my Private Member’s library for my newsletter subscribers. Members receive the password in their newsletters.
If you are not yet a subscriber and would like access to my freebies page, you can join HERE.
Instructions
1. Place the backing fabric in the hoop – I actually used a layer of wool batting under my fabric, but that is completely optional. Trim the fabric around the hoop edge to 1/2″ and glue to the inside of the inner hoop.
2. Next up is the button card. Print the button card graphic onto either matt photo paper or cardstock. Cut the design out using pointy scissors or a scalpel knife.

3. Now you are ready for the layering. simply layer all your pieces of torn fabric, lace etc across your button card and glue down the ends on the backside of the button card. Get creative and enjoy the process of adding nits and bobs. I tucked in some cotton spool shapes and a pair of chipboard scissors, but you may have your own embellishments you’d like to use.

4. Once your button card is complete, adhere it to your hoop with clear glue or a glue gun.
I finished my hoop off with a pretty pink bow and a fabric self-covered button at the top.
Isn’t that sweet!!
Of course the options for embroidery hoop art are endless and I can’t wait to add many more hoops to my wall.

Have you ever used embroidery hoops before?
They are such an inexpensive frame and combined with crafting scraps makes this a crafty project anyone can do.
Thank you for sharing this PIN

Happy crafting my friends!!
Hugs
♥
Kerryanne
I’d love for you to connect with me at:


Follow on Bloglovin
or if you’d like my posts delivered directly to your Inbox
Subscribe to Shabby Art Boutique by Email
If you’d like a private pass to all things ‘shabbilicious, sign up today for my fortnightly newsletter.
It contains personal stories, sneak peeks, recommendations, discounts and freebies.


I love that idea kerryanne, thank you for sharing ?
I cannot find password. I am sorry.
Lauren
Looks great 🙂
I absolutely love this hoop!
I used embroidery hoops for a booth that I had several years ago and stenciled downthelanewithdaisy on them, one letter on each hoop that was lined with all different fabrics. I think I’m going to get them out and put them up again. Thanks for the inspiration. I’ll embellish each hoop a little.
Kerryanne, that is just adorable…thank you for sharing.
I love this! I, too, determined after our move to use my stock crafty items before heading to the store!