Hello shabbilicious friends…
I’ve been away on a fabulous ‘secret’ adventure…. and I like adventures!
This was a surprise 50th birthday party, but instead of the guests surprising the birthday girl, she surprised her guests.
I’m home now and sworn to secrecy, but while I can’t tell you whose party it was or share any of the photos, I can tell you about the surprise.
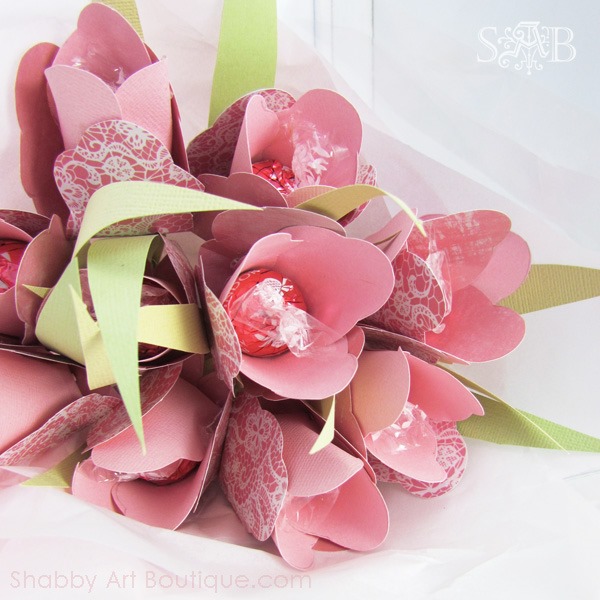
And I’m also sharing how I made these pretty chocolate flowers for the birthday girl.
So, late last week I flew 1200 kilometres to a different state.
Then I waited for a message for stage 2.
The night before the event I received an address and a time.
On Saturday I arrived at the address…. oh my, the 6.5 acre property had the most amazing gardens and a gorgeous Victorian home built in 1854.
Once there we were treated to a day of total pampering… morning tea, champagne, spa and pool, facials, lunch, massages, pedicures and manicures, and more bubbles and laughs. It was such a fabulous way to celebrate a beautiful friends 50th birthday.
While I had already organized a gift for my girlfriend, I wanted to give her a little something when I arrived, but it had to fit in my suitcase and survive the flight.
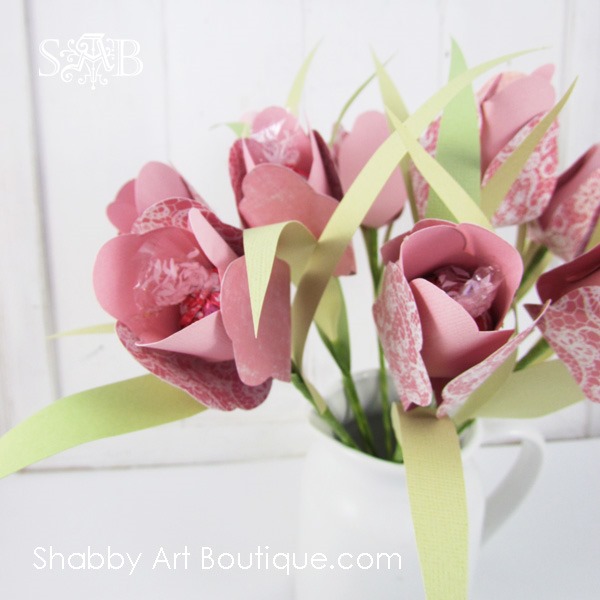
Fresh flowers weren’t going to cut it, so I made these pretty Lindt chocolate blooms…. and they were a big hit!
Let me tell you, these are super easy and came together in about 1.5 – 2 hours.
Materials
Chocolates – I used Lindt chocolates that are already individually wrapped.
Scrapbook papers – I used a plain pink and a sheet that had a double sided pattern (2 sheets made 7 – 8 flowers). I also cut leaves from 2 different coloured green sheets of scrapbook paper, but only used a small portion of each sheet.
Skewers,
Green florist tape,
Hot glue gun,
Pattern template (see below).
Incidentals – craft scissors, optional hammer and hole punch, tissue paper and cellophane to wrap.
Template: Right click and save this image to your own computer.


Instructions
2. I traced the pattern onto a piece of cardboard and cut it out to use as a template. If you place the flowers close together you’ll get 7 – 8 flowers per sheet, so 2 sheets of 30 cm x 30 cm scrapbook paper will yield 8 blooms. I used a hole punch to make a hole in the centre of each flower tracing, but if you don’t have a punch you can just use a craft knife.
3. Once you have cut out all your flowers, use your fingers to bend the petals up slightly. To create greenery, I cut long strips out of green paper (all different sizes) and used my fingers to curl them over slightly at the top.
4. To make the chocolate Lindt balls into flowers, I pushed the pointy end of the skewer into the ball at one end, where the cellophane twists. To hold it in place, wrap green florist tape around it by stretching the tape as you wrap it. This makes the tape sticky.

5. Slide the first cut-out petal trio onto the skewer and right up to the base of the chocolate ball.
6. Use a small dob of hot glue to close the petals up by overlapping each one over the next.
7. Slide the second set of petals onto the skewer. These ones are not closed quite as tightly around the bloom. Position this second set of petals so they close over the spot where the first set of petals overlapped. Add small dots of hot glue to hold them in place.
Believe me when I tell you every flower will be different, but when you put them together in a bouquet it looks perfect. I just played with each flower, curling the edges of petals over and squeezing, moulding and foomphing… is that even a word? Hmm… might be a Kerryism! I think you get the gist though – there’s no right or wrong on this one.
Attach a leaf or two to each skewer using the stretchy green florist tape, then continue winding the tape all the way to the bottom of the skewer.
8. Bundle your flowers into a bouquet. I used 10 for this one, but I think 12 gives a nice fullness. You can wrap them in tissue and cello like a bouquet or arrange them in a flower arrangement or vase.
Think of the possibilities for using chocolate flowers… a house warming gift, new baby, birthday, thank you, anniversary. You could even give them individually with a big ribbon and tag attached.

Pin this image for later!
I know this will be a project I’ll make many times. I hope you enjoy it too!
Happy crafting ~ Kerryanne
I’d love for you to connect with me at:


Follow on Bloglovin
or if you’d like my posts delivered directly to your Inbox
Subscribe to Shabby Art Boutique by Email
If you’d like a private pass to all things ‘shabbilicious, sign up today for my fortnightly newsletter. it contains personal stories, sneak peeks, recommendations, discounts and freebies.
Sign up for my newsletter HERE and don’t forget to confirm the sign up email.


Hi Kerryanne,
How fun and pretty are these and what a perfect fun gift. I am going to make these for a baby shower I am headed to this week end. I got the baby gift but wanted something special for the mom to be and I think these will be perfect. Thank you for the template.
Kris
What a lovely idea, Kerryanne.
A beautiful idea Kerryanne. Thank you for the tuition
What a wonderful idea!
These are lovely Kerryanne – what a super idea.
Toni xx
This is so incredible! Better to make my own than spend a great deal of money having someone make it for me. Thanks a lot for this genius ideaxx
I have been looking for a tutorial to make a chocolate bouquet for Mother’s Day. It’s now too late for Mother’s Day, but I can make them for a Christmas gift 😀 Thank you so much for sharing your awesome tutorial!!
You are most welcome Michelle. They are super easy, yet look very impressive.
I hope you enjoy this project as much as I did. 🙂