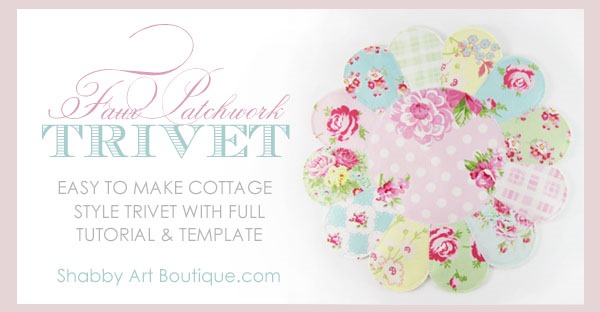
Today I’m sharing an easy and very practical project… a fabric trivet.
This is something we all need, but this one is perhaps a little different to others you’ve seen.
It’s a faux patchwork trivet that you can whip up in about 30 minutes.
This post contains affiliate links for your shopping convenience.
I love the look of patchwork. I even enjoy making patchwork, but it does take time and that is something I rarely have spare these days.
That is why I often make faux patchwork. It looks pretty like real patchwork, but is quick, easy and a fun applique type project.
The added bonus it that it is so easy and a perfect technique for the beginner sewer. You don’t even need a fancy sewing machine. Today I’ve just used my basic Sewing machine
Sometimes projects are derived from necessity and I love those kind of crafty projects… don’t you!
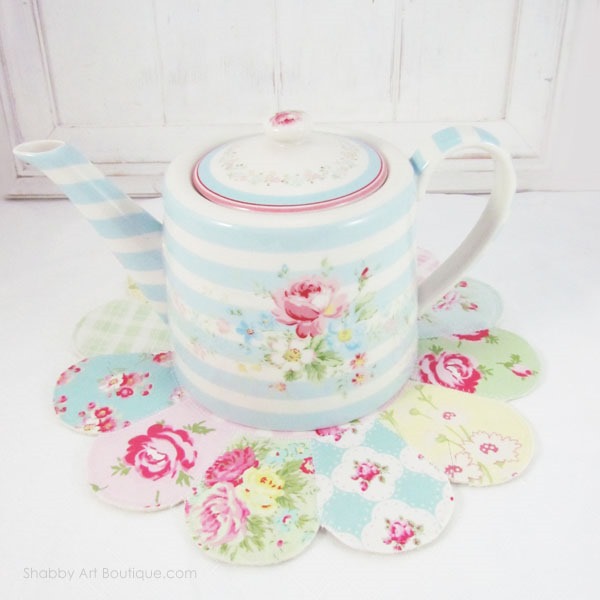
My new GreenGate teapot is my new fav item in the kitchen, but I’ve found it does get warm on the bottom. So, I needed a trivet to protect my table from heat and moisture.
I love the look of Dresden Plate patchwork blocks… so I got to wondering if I could reproduce that look with my faux patchwork technique.
Honestly, there wasn’t much planning with this, so I’m glad I thought to take photos as I went along.
Materials:
Wash all fabrics before use.
12 x small scraps of cottage fabrics for the Dresden petals,
1 x larger piece for the centre circle,
2 pieces of calico fabric measuring 40 cm x 405 cm each,
1 x 40 cm x 40 cm piece of cream wool felt,
1 x template – download here,
Small amount of Visoflex (iron on applique paper) – see note.
Sewing machine and usual sewing supplies eg, scissors, pins,
White sewing cotton,
Iron.
Note: Applique papers have lots of different names. Visoflex is the one I have readily available where I live, but yours may be called something entirely different. What you need is an iron on paper sold for patchwork and applique.
Instructions:
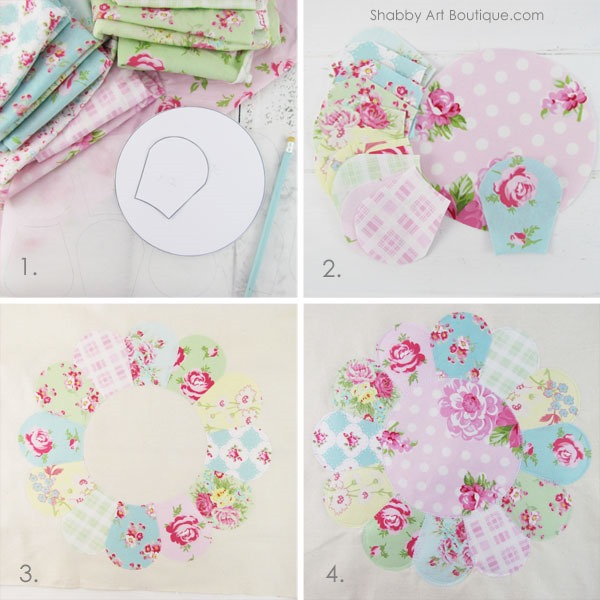
1. Cut out your template from the pattern sheet (I printed mine directly on to light card). Using the petal template, trace around it 12 times on the paper side of the applique paper. As you can see, I spaced mine fairly close to each other. Cut out paper petals allowing a 3 – 5 mm excess around the edge of design.
2. Choose your cottage style fabrics. You only need a small piece for each of the 12 petals, so it is a great project for your fabric scraps. Set your iron to no steam and iron the applique cut-outs onto the back of your fabric. Choose one fabric to be your centre circle and trace the template onto applique paper and iron onto the back of fabric. Cut petals and circle out on the template line.
3. On your first piece of calico fabric, centre the circle template in the middle and trace around it with a pencil. This shape will form the basis of your petal design. Remember to place your petals slightly inside the circle, so that when you iron the centre fabric piece on at the end, it will partially overlap the petal design.
Peel of the backing papers and place the petals on the calico fabric. Make sure they all fit and you are happy with the positioning before ironing on. Starting with the first one, iron on without steam. Continue adding petals around the circle until you have reached the first one again.
4. Remove the backing from the large centre circle and iron into position.
5. Sandwich the wool felt between your top appliqued fabric and the backing piece of calico. Pin in place to secure for sewing.
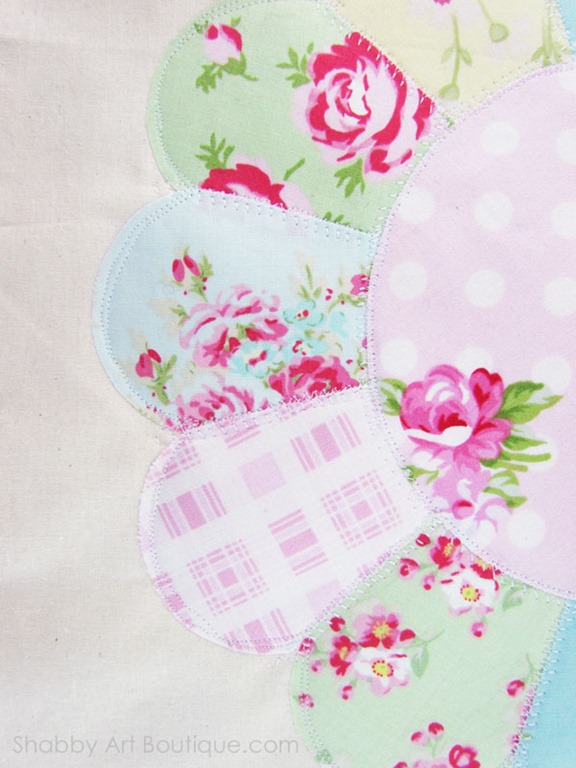
6. I used a decorative Tree stitch on my sewing machine to sew between each petal, starting at the center circle and sewing outwards, stopping when I reached the calico. I repeated this for all 12 petals. I felt this stitch looked like a patchwork stitch, but you could choose a different stitch.
7. Next I used the same technique to sew around the centre circle. Then, using a sewing needle, I pulled all threads through to the back and knotted and removed any excess cotton.
8. Using a straight sewing stitch, I sewed around the outer edge of the Dresden plate design several times with a free motion style look – about 2 – 3 mm inside the outer edge. If you have a free motion foot, use that, but this look is still achievable without it. Remember, this is not real patchwork and is more funky and relaxed…. just have fun with it!!
9. When you have finished sewing, cut around the outside of the design with sharp scissors, removing all the excess fabric. Over time with use and washing, the edges will fray slightly and that’s what gives the faux patchwork its cottage look.
Finished size – 30 cm x 30 cm (12” x 12”)
You can resize the template to alter the finished size. This size was perfect for my teapot!

I’m really pleased with how my faux patchwork trivet turned out. I may even continue on with some hand quilting across the centre circle.
Hmm… I think I need some matching pieces for my cottage kitchen. Don’t these pretty pastel colours make you feel cheery?
[PIN for later]

If you liked this faux patchwork project, you may also like my faux patchwork cushion, shabby scrappy hearts and faux patchwork mug rug.


Happy sewing my friends,
♥
Kerryanne
I’d love for you to connect with me at:


Follow on Bloglovin
or if you’d like my posts delivered directly to your Inbox
Subscribe to Shabby Art Boutique by Email
If you’d like a private pass to all things ‘shabbilicious, sign up today for my fortnightly newsletter. It contains personal stories, sneak peeks, recommendations, discounts and freebies.


So very delightful, the fabric you used are so perfect and shabby for adorable project. I love old fashioned looking fabrics and papers, can hardly wait to make some of these for gifts as well as myself. Thank you so much for sharing your incredible projects. Love your new tea pot, you’ll enjoy using it for many years to come.along with your trivet. Happy week
What a beautiful addition for your new teapot. Your choice of fabric matches so well.
Thank you for sharing this lovely make.
Toni xx