Over the past 30 years I’ve been fortunate to have many different studio spaces and craft rooms.
I’ve enjoyed all of them… big and small…. and as these creative spaces are my workplace, I always enjoy decorating them for the festive season.

We’ve been in our new house 9 months now and I have to say that this has been the best laid out and most organised creative space I’ve ever had. The storage around the perimeter of the room works perfectly, making everything just flow so well.
When I was considering what decorations to put up in here for Christmas I was thinking about colour palettes and themes and suddenly it seemed quite obvious….. I love being surrounded by all my creative supplies every day, so why not enhance what I already have.

I started by making this ‘Makers Christmas Wreath’, decorated with all the creative pretties I love.
It’s totally ME…… And I LOVE it!!
[PIN for later]

Do you have a creative space or a place of your own to hang a Makers Christmas Wreath?
It’s actually really simple to make and you probably already have most of the supplies right there in your crafting stash.
How to make a Makers Christmas Wreath
Materials
Note: This is what I used to make mine, but you may wish to make yours more personalised and theme it to a specific craft eg. knitting or sewing.
I knew I wanted a shabby chic style that suited my craft room colours of aqua, pink and cherry, but you could adjust to suit your own colour scheme.
For my Maker’s Christmas Wreath I used:
- 35cm styrene wreath
- fabric strips to cover the wreath
- Printable lace, ribbon and thread boards (available below)
- Printable Button cards
- Wooden spools and wooden buttons
- Crafting supplies; lace, ribbon, flowers, pins
- Hot Glue Gun

Instructions
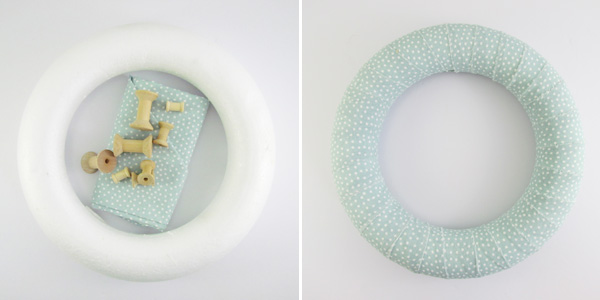
1. Gather all of the crafting supplies you think you may need and make sure to have a variety of sizes. This is a layering technique, so you’ll need tiny little things to fill in the gaps.
2. Start by preparing your styrene wreath. I covered mine in strips of ripped fabric that was 5 cm (2 inch) wide. Using the hot glue gun, I wound the fabric around the wreath, adhering the ends as I made my way around the wreath. It’s easier to add a hanger at the top of the wreath now, before you add of the crafting supplies.
3. For the next layer I wound tape measures and lace randomly around the wreath… note, a lot of this will not be seen once the wreath is finished, so this step is optional.
4. Print the lace and ribbon cards printable I made.
It’s available to download HERE as A4 and HERE as Letter size.
I printed mine on 250 gram matte photo paper, which is like a light card. Cut out boards and add your embellishments eg. ribbon, lace, embroidery thread.

5. I also added my vintage button cards from my Etsy store HERE. Sew or glue buttons onto cards.
6. Next I added fabric strips and embroidery cotton to my wooden spools using a hot glue gun to adhere in place.
7. I painted the wooden buttons to match my colour scheme and some of them also got a dusting of German Glass glitter…. because it is Christmas!
8. Some of the smaller elements I added in were these mini felt flowers and crochet flowers.
9. The wool balls were made using small Christmas baubles covered in white glue and wound with wool. Tip: I removed the hanger at the top while I was making them and then popped the hanger back on when finished.

10. Add your lace and button boards first as a base, evenly spread out around the wreath. Next, start adding in all of your crafting supplies using a hot glue gun… and take care, those glue guns are ‘HOT’.
It’s actually a really fun process building up the layers. I thoroughly enjoyed this project and hope you do too!
I’ll have more photos of the Maker’s Christmas Wreath when I share my Christmas craft room tour.
Happy Christmas crafting my friends,
Hugs
♥
Kerryanne
I’d love for you to connect with me at:


Get instant access to the free printables in our Member’s Only
library by joining my email newsletter subscriber’s list.
I send out two newsletters a month with updates on all things
‘shabbilicious’ at Shabby Art Boutique.
Follow on Bloglovin or join our Facebook group Simply Shabbilicious.


Kerryanne,
Thank you for the inspiration. This is one of my favorites of all time.
Oh wow Michele… so glad you like it. It’s quite easy to make too and most enjoyable 🙂
Kerryanne,
You make the most beautiful items. I love this one. Thank you
Meg
Thanks so much Meg xx
Absolutely gorgeous KerryAnne??????✂️? Thank You for sharing and inspiring? Love love love this? You are a beautiful artist??? Smiles, Deborah ???
Awww… thanks so much Deborah. You’ve made my day with your lovely comment and appreciation xx
Oh my goodness Kerryanne. You never fail to inspire, delight and amaze me with your creativity. Thank you so much.
Thanks so much Lorraine. It makes my day to know I’ve inspired someone creative.
Hugs,
Kerryanne
This is SO pretty, and just my style! Thank you for showing us and for the downloads!
Glad you like it Barbara. I’m really pleased with how it turned out… it’s exactly as I was envisioning it to be and I’m enjoying having it on my wall above my desk 🙂
GORGEOUS wreath! And the perfect addition to any craft room.
Thanks so much Alexandra 🙂
Just delightful!
Oh my word, this is the prettiest wreath, aside from being an absolutely adorable maker’s wreath. I just want to sit here with my morning coffee and take in each pretty embellishment. LOVE LOVE LOVE this!
Oh, that’s so sweet of your Marie. There is quite a lot to see… while I was making it I was searching through all of my crafting boxes and adding in little odds and ends like felt flowers and fancy pins. It really was a joy to make.
So stinking pretty! I’ve never heard of a ‘maker’s wreath’… thank you for the introduction!
Thanks for visiting today Julie. I’m so pleased you like my ‘makers’ wreath. It was so much fun to make and I finally found a place to put lots of itty bitty trinkets I’ve made – lol.
Happy Thanksgiving to you and your family sweetie x
Well, it’s so pretty, I’m featuring you at Tuesday Turn About today! 😉
That’s so sweet of you Julie… thank you lovely xx
One of the most creative things I’ve seen all season! Love it!!
Truly in love with this wreath. It’s an unforgettable piece . Please post at Funtastic Fridays at 9pm on Thursday Nights.