Since we moved into our new house in February, there’s been a continuous list of DIY jobs and room renovations to complete, new gardens to plant and walls to be painted.
It’s been exhilarating to see each new space come to life in our own style and I feel like we are almost nearing the end of the process.
This means I can tackle a few of the not so important jobs and today I happily ticked off a small item on my list…. a key ring for the key that opens the French doors in the craft room. I swear that key has spent more time floating around either misplaced or missing.
So, today I made a key ring that was perfect for the craft room and will now allow me to hang the key where I can always find it.

It struck me while I was making these two easy applique patterns that they could also be used for a scissor fob.
Don’t you just love projects that are super quick and easy and use up tiny scraps of fabric!
These simple key rings tick all of those boxes.

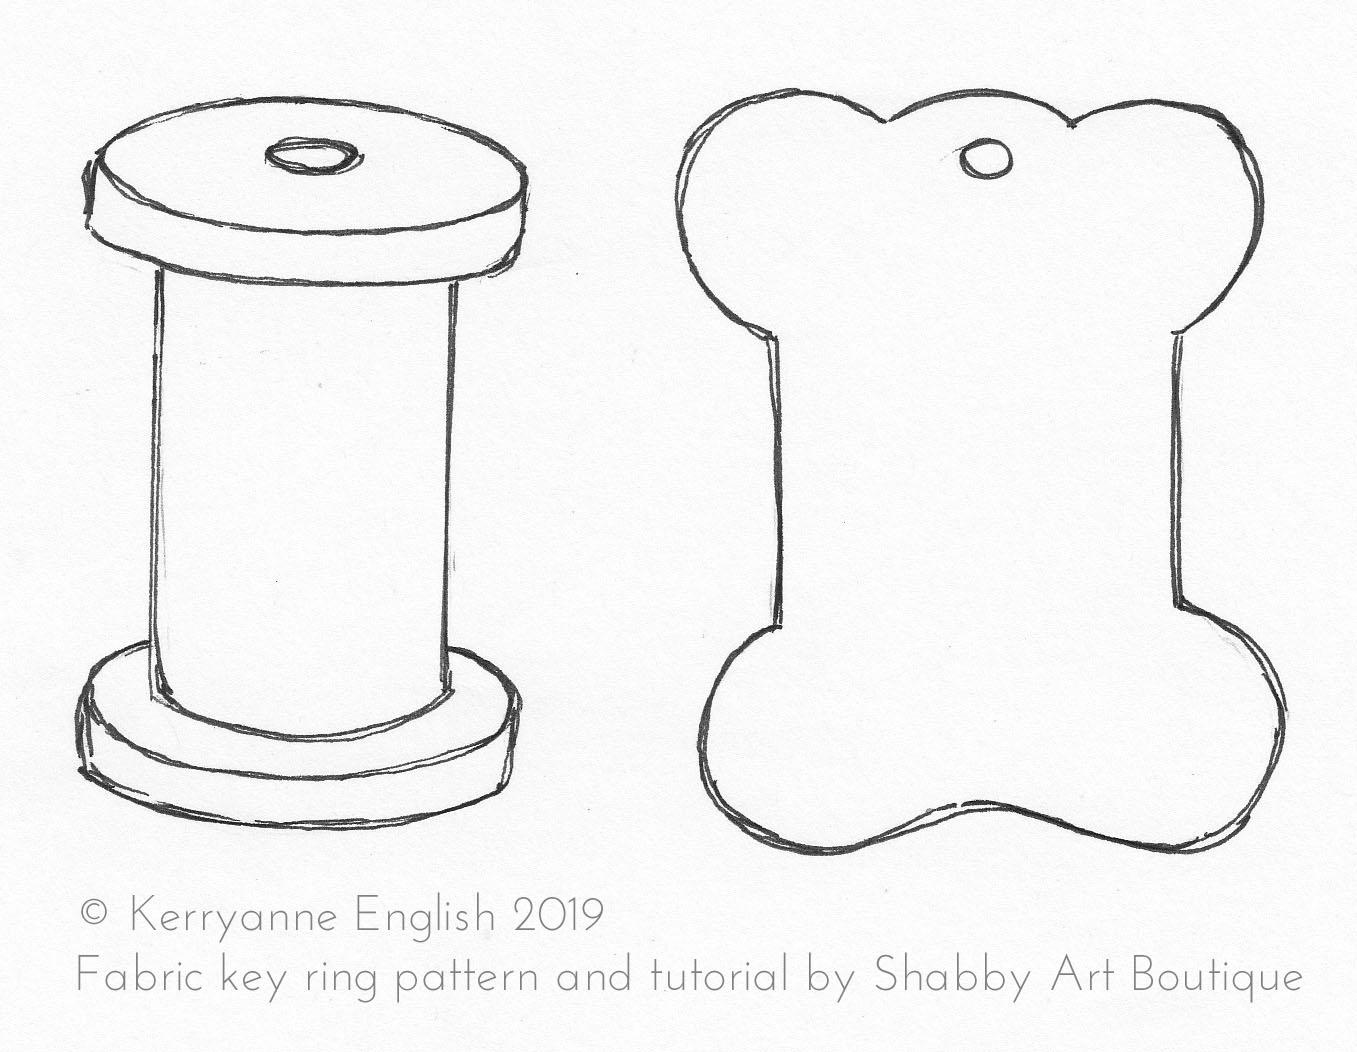
How to make a crafter’s key ring
Materials
– small scraps of fabric ( I used a neutral muslin for the spool and pretty florals for the center part of the spool and the ribbon board).
– small piece of cream felt
– Visoflex (or similar iron on applique paper),
– Pattern Template
– Iron
– Sewing machine and usual sewing supplies.
Instructions
1. I used the pattern to make a template out of card. This was used to trace the design outline onto the fabrics. Next, I traced the design for the center part of the spool onto the paper backing of the Visoflex.
2. As I wanted to make my key rings to be double-sided, I folded the fabric in half. This will later form the front and back of my key ring.
Set your iron to no steam and iron the first applique cut-out onto the tracing of the spool on your fabric. To line up the applique piece on the other half, I simply held my folded fabric up to the window so the light would shine through it. This allowed me to line up the second applique piece with the front panel. I then held it in place firmly and quickly ironed it on.

3. Pin the backing wool felt between the front and back of the main fabric and using a free motion stich technique, stitch around the perimeter twice. This is not a precise technique, so relax and have fun with it.
4. When finished, secure cotton ends and then, using sharp scissors cut away the excess fabric. For the ribbon board, after it was all cut out I wrapped some pretty ribbon around it and stitched it on the sides to secure. You could substitute the ribbon with lace if you prefer.
As you can see, I also stitched the hole at the top of each piece. To open the hole I pierced the centre of that hole with my craft knife. This allowed me to thread it on to my key ring.
This was a very quick and easy project, and one that perfectly fits with a craft room or she shed.

If you are feeling crafty, check out my fall tutorials HERE.
Happy crafting my friends!!
Hugs
♥
Kerryanne
I’d love for you to connect with me at:


Get instant access to the free printables in our Member’s Only
library by joining my email newsletter subscriber’s list.
I send out two newsletters a month with updates on all things
‘shabbilicious’ at Shabby Art Boutique.
Follow on Bloglovin or join our Facebook group Simply Shabbilicious.


Thank you for sharing kerryanne, lovely idea ?
These would make gorgeous Christmas ornaments for your favorite seamtress, quilter, etc.!
Ohh, another thought (and this is on 1 cup of coffee! I would use a round-sided awl to make the hole to spread the threads rather than cut them; this way they won’t ravel!
About what size are they supposed to be? The pattern I printed seems too large. Wondering if its my printer….
Hi Trish,
If you place the .jpeg image into a word document and print, it will come out the right size. The key rings are approximately 7 cm long.
Happy crafting,
Kerryanne